
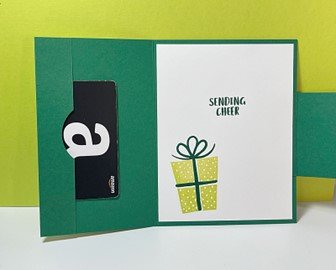
When it comes to giving gifts, a personal touch can make all the difference. If you’re looking for a creative and festive way to present a gift card, I’ve got just the project for you! In this step-by-step tutorial, you can craft a beautiful gift card holder using Stampin’ Up!’s Merry Bold & Bright Designer Series Paper (DSP). This eye-catching paper is perfect for adding a touch of holiday cheer to your gift-giving.
Gift Card Holder Supplies (Links Below):
- STAMPS – Sending Cheer, Bundle & Save
- PAPER – Shaded Spruce, Lemon Lime Twist, Basic White, Merry Bold & Bright
- INK – Shaded Spruce, Lemon Lime Twist
- OTHER – 1 3/4” Circle Punch, Christmas Tidings Embossing Folder, Adhesive-Backed Glitter Sequins, Parakeet Party Metallic Woven Ribbon, Stampin’ Cut & Emboss Machine, Paper Trimmer, Multipurpose Liquid Glue, Stampin’ Dimensionals, Bone Folder
Gift Card Holder Measurements:
- Shaded Spruce – 8 1/2” x 5 1/2” scored at 1” & 4 1/4” on the long side, , 2 1/2” x 4 1/4” scored at 3/4” on the short side
- Basic White – 2 1/4” x 3 1/4”, 4” x 5 1/4” & scrap
- Merry Bold & Bright DSP – 3” x 5 1/4” & scrap
- Lemon Lime Twist – scrap
Instructions:
- Fold and burnish score lines on card base and Shaded Spruce flap. Punch out notch on flap for gift card pocket. Add Liquid Glue to sides of pocket to secure.
- Adhere DSP to left flap on card front. Adhere 3/4” tab edge of 2 1/2” x 4 1/4” Shaded Spruce layer to card base where shown, lining up folded edge with outside edge of base.
- Stamp Shaded Spruce inside sentiment on large Basic White layer. Stamp present in Lemon Lime Twist Ink and bow image with Shaded Spruce Ink.
- Stamp OPEN ME sentiment on Lemon Lime Twist scarp with Shaded Spruce Ink. Die cut Basic White bow, DSP present, circle label and emboss small Basic White layer in embossing folder.
- Adhere Basic White embossed layer to flap. Cut bow off top of present layer. Adhere Basic White bow to present and add to embossed panel with Stampin’ Dimensionals.
- Add ribbon to circle sentiment. Adhere to card front with Stampin’ Dimensional positioning it as a closure for the flap.
- Embellish bow with green Adhesive-Backed Glitter Sequin.
With Stampin’ Up!’s Merry Bold & Bright DSP, creating a custom gift card holder has never been easier. This simple DIY project allows you to add a personalized touch to your holiday gift-giving, making the presentation as special as the gift itself. Get creative, have fun, and share the joy of the season with a handmade gift card holder that reflects your unique style.
To make projects like this in a class setting, check out my class calendar to see my upcoming virtual and in person classes, and my class page for all my class offerings.
Links:
")

 Designer Series Paper")


 Metallic Woven Ribbon")

 Circle Punch")


0 Comments