
Another bundle with MASKS – Layers of Beauty! It’s no secret that I love the technique of pre-designed masks that coordinate with stamps and even dies – I’ve shared our recent ones here and here. And now there’s a brand-new set coming in the 2024-2025 Annual Catalog!
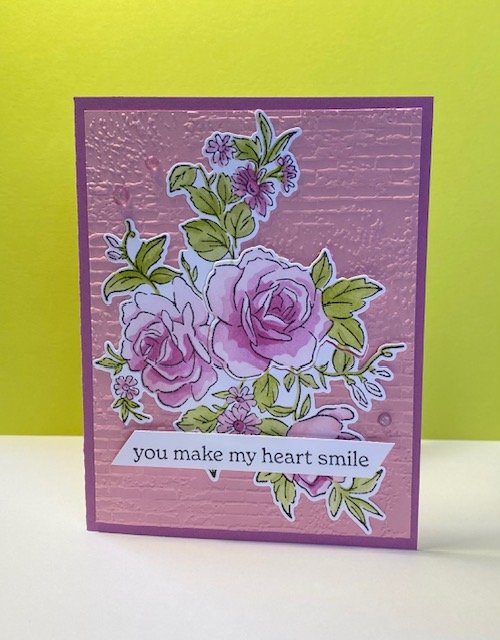
Now I’ve had the chance to play with this bundle a bit, and while it IS very similar to the Enduring Beauty bundle, it has some extra features. First, the sketchy line art is a bit more country looking. Then, there is a die that cuts out one of the flowers which allows for some easy layering. Third, the stamp set has a “Happy Anniversary” sentiment, which is one I’m always looking for!
Watch how to make this card with all the Layers of Beauty elements, along with some tips as I made it during my Quick Class on 4/17:
I’ve also included a detailed tutorial below. For info about my upcoming in-person and virtual classes, check out my class descriptions here and my calendar here. For more ideas every month, be sure to sign up for my weekly newsletter at the bottom of this page. Thanks for checking this out!
Layers of Beauty Card Measurements:
- Petunia Pop – 8 ½” x 5 ½”, score and fold at 4 ¼”
- Basic White – 4” x 5 ¼” (2), ½” x 4” strip
- Pretty in Pink – 4” X 5 ¼”
Instructions:
- Cut all paper.
- Fold Petunia Pop card base. Adhere one Basic White panel to inside of card.
- Emboss Pretty in Pink panel using the Exposed Brick 3D Embossing Folder. Adhere to card front with Multipurpose Liquid Glue.
- Stamp large floral image on other Basic White panel using Memento Tuxedo Black ink. Lay result onto a piece of scratch paper and put washi tape or a post-it note on at least one edge to secure it.
- Starting with Mask #1, line up the flowers in the holes on the mask. Adhere with washi tape or post-it note to hold in place. Also mark the scratch paper where the notch on the mask is. Using a Blending Brush, apply Pretty in Pink ink into the holes in the mask to the paper. Remove mask.
- Line up Mask #2 with the notch mark you made on the scratch paper. This should line up the holes in the mask with parts of the flowers you colored with Mask #1. Using a Blending Brush, apply Petunia Pop ink into the holes in the mask to the paper. Remove mask.
- Repeat step #6 with the following: Mask #3 with Berry Burst ink, Mask #4 with Lemon Lime Twist ink and Mask #5 with Granny Apple Green ink.
- Die cut floral image with coordinating die. Then, using the single flower/leaf die, cut this flower from the larger image.
- Adhere larger image to the embossed card front using Multipurpose Liquid Glue. Add the flower/leaf die cut into the spot from which it was cut using dimensionals.
- Stamp sentiment on ½” Basic White strip using Memento Tuxedo Black ink. Trim edges on angle. Add to card front using dimensionals.
- Add Shimmer Gems as desired.
Layers of Beauty Card Supplies:
- Layers of Beauty Bundle (stamps, dies, masks)
- Petunia Pop cardstock
- Pretty in Pink cardstock
- Petunia Pop ink pad
- Pretty in Pink ink pad
- 2024-2026 In Color Shimmer Gems


0 Comments