")
This week’s Quick Class featured a beautiful birthday card using the Velvet Meadow Specialty Designer Series Paper, and I have to say, this paper is even prettier in person.
The designs are soft, floral, and full of gorgeous color, but what really makes this paper special is the texture. Some of the white areas have a velvet-like flocking that adds such a lovely touch. It is one of those papers where a little bit goes a long way, which makes it perfect for a simple card layout like this one.
You can watch the full video replay below and follow along as I walk through the card step by step.
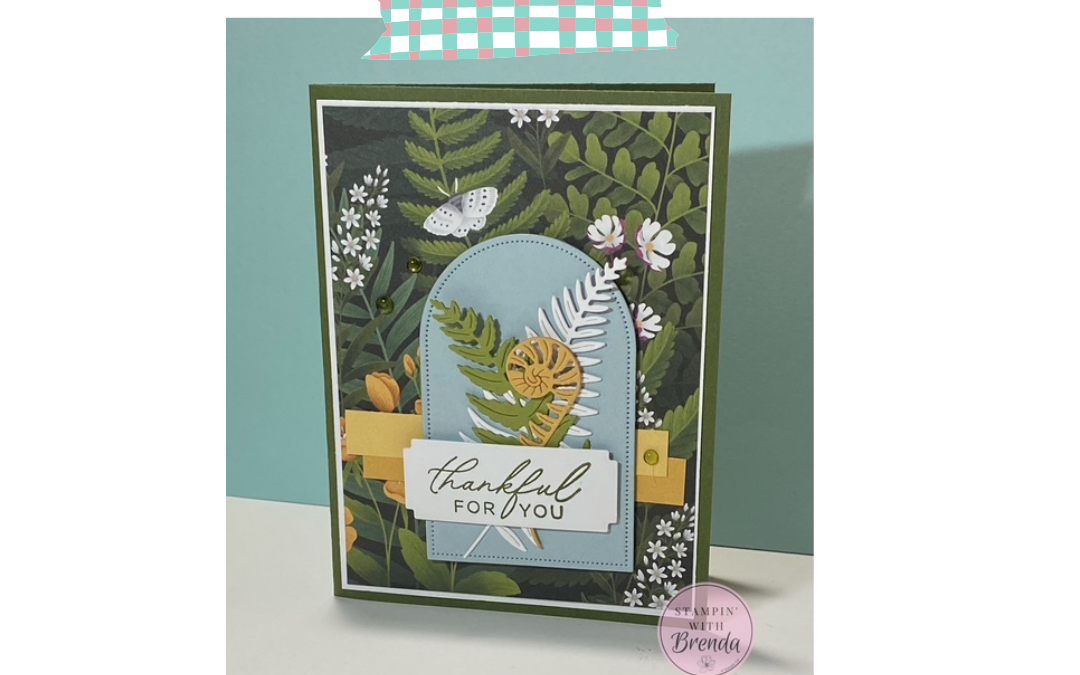
For this card, I wanted to use the Velvet Meadow paper without using a huge amount of it. The layout uses two smaller pieces of Designer Series Paper, one at the top and one at the bottom, with a sentiment strip placed across the center.
This is a great sketch to keep in mind whenever you have patterned paper you love but want to stretch it across several cards. The pieces I used were cut to 2″ x 3″, which lets you get quite a few pieces from one sheet.
The two patterned paper pieces are layered onto a piece of Basic White cardstock measuring 3 1/4″ x 4 1/2″. That layer is then added to a slightly larger piece of Cloud Cover cardstock, which measures 3 1/2″ x 4 3/4″.
Cloud Cover is one of the colors in the Velvet Meadow paper, so it works beautifully as a soft mat behind the floral patterns.
A Quick Adhesive Tip
Because the Velvet Meadow Specialty Designer Series Paper has texture on some of the designs, you may want to use liquid glue when adhering it. Even if the piece you are using does not have a heavily textured area, the specialty finish can sometimes make it harder for tape-style adhesive to get a strong grip.
Liquid glue gives you a little wiggle room and helps everything stay secure.
Adding the Sentiment
For the greeting, I used a Happy Birthday sentiment from the Balloon Festoon Stamp Set and stamped it in Peaceful Pine ink.
The sentiment strip was added with dimensionals to give the card a little lift. I originally made the card with the sentiment flat, but after looking at it again, I decided the extra dimension made a big difference. Sometimes those little changes are what make the card feel finished.
To add a soft accent, I used Barely Blush Bordered Ribbon. The ribbon was wrapped around the card layer before attaching it to the card base, then a small separate piece was tied around it to create a simple knot.
I also added a few Dreamy Flowers embellishments to finish the card. These little flowers do not sparkle, but they add such pretty texture and color. I placed them in a visual triangle to help balance the design.
Try This Card Sketch with Other Papers
One of my favorite things about this card is how easy it is to adapt. You could use this same layout with almost any Designer Series Paper. Choose two coordinating patterns, add a cardstock mat, stamp a greeting, and finish with ribbon or embellishments.
It would work beautifully for:
Birthday cards
Thank you cards
Thinking of you cards
Congratulations cards
Friendship cards
This is one of those layouts that looks polished but comes together quickly, which makes it perfect for classes, card stacks, or whenever you want to make several cards at once.
If you’d like to make cards like this with me, keep an eye out for my June class schedule. For info about my upcoming in-person and virtual classes, check out my class descriptions here and my calendar here. I hope to see you at a class sometime soon, but you can always find ideas here on my blog as well as on Facebook and Instagram. Subscribe to my weekly newsletter at the bottom of this page so you don’t miss a thing!
Velvet Meadow Card Measurements:
- Thick Basic White Card Base—5 1/2” x 8 ½”, scored at 4 ¼”
- White Willow – 3 ¼” x 4 ½”, 3” x ¾”
- Cloud Cover – 3 ½” x 4 ¾”
- Velvet Meadow 12” x 12” DSP – 3” x 2” (design 1), 3” x 2” (design 2)
Velvet Meadow Card Supplies:
![Balloon Festoon Photopolymer Stamp Set (English) [ 167602 ]](https://assets1.tamsnetwork.com/images/EC042017NF/167602s.jpg "Balloon Festoon Photopolymer Stamp Set (English) [ 167602 ]")
![Velvet Meadow 12" X 12" (30.5 X 30.5 Cm) Specialty Designer Series Paper [ 167904 ]](https://assets1.tamsnetwork.com/images/EC042017NF/167904s.jpg "Velvet Meadow 12\" X 12\" (30.5 X 30.5 Cm) Specialty Designer Series Paper [ 167904 ]")
![Basic White 8 1/2" X 11" Thick Cardstock [ 159229 ]](https://assets1.tamsnetwork.com/images/EC042017NF/159229s.jpg "Basic White 8 1/2\" X 11\" Thick Cardstock [ 159229 ]")
![White Willow 12" X 12" (30.5 X 30.5 Cm) Cardstock [ 166703 ]](https://assets1.tamsnetwork.com/images/EC042017NF/166703s.jpg "White Willow 12\" X 12\" (30.5 X 30.5 Cm) Cardstock [ 166703 ]")
![Cloud Cover 8 1/2" X 11" Cardstock [ 165621 ]](https://assets1.tamsnetwork.com/images/EC042017NF/165621s.jpg "Cloud Cover 8 1/2\" X 11\" Cardstock [ 165621 ]")
![Peaceful Pine Classic Stampin Pad [ 167679 ]](https://assets1.tamsnetwork.com/images/EC042017NF/167679s.jpg "Peaceful Pine Classic Stampin Pad [ 167679 ]")
![Barely Blush 3/8" (1 Cm) Bordered Ribbon [ 167550 ]](https://assets1.tamsnetwork.com/images/EC042017NF/167550s.jpg "Barely Blush 3/8\" (1 Cm) Bordered Ribbon [ 167550 ]")
![Dreamy Flowers [ 167916 ]](https://assets1.tamsnetwork.com/images/EC042017NF/167916s.jpg "Dreamy Flowers [ 167916 ]")
![Stampin' Cut & Emboss Machine [ 149653 ]](https://assets1.tamsnetwork.com/images/EC042017NF/149653s.jpg "Stampin' Cut & Emboss Machine [ 149653 ]")
![Stampin' Seal [ 152813 ]](https://assets1.tamsnetwork.com/images/EC042017NF/152813s.jpg "Stampin' Seal [ 152813 ]")
![Bone Folder [ 102300 ]](https://assets1.tamsnetwork.com/images/EC042017NF/102300s.jpg "Bone Folder [ 102300 ]")
![Take Your Pick [ 144107 ]](https://assets1.tamsnetwork.com/images/EC042017NF/144107s.jpg "Take Your Pick [ 144107 ]")
0 Comments