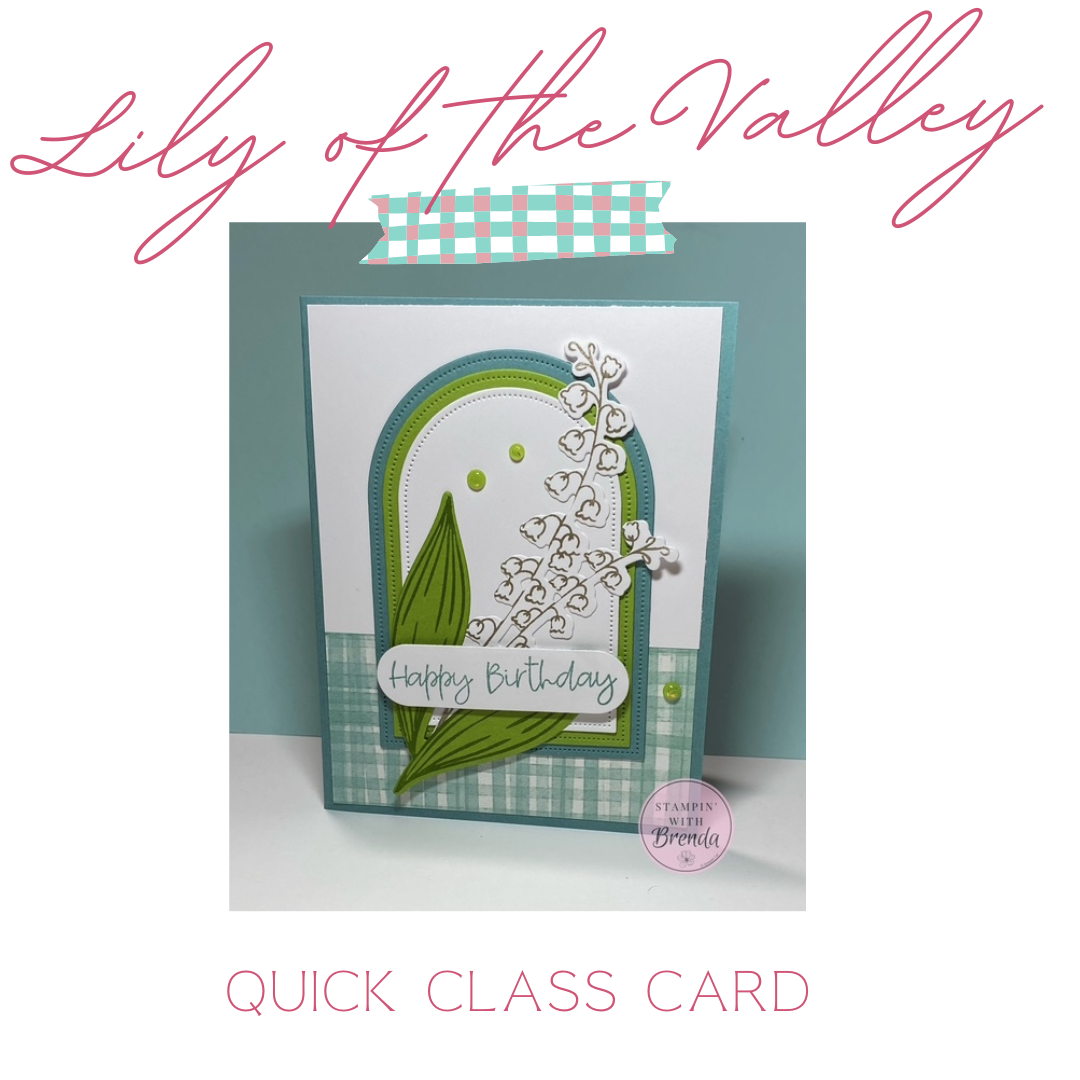
The Lily of the Valley Bundle takes center stage in this week’s Quick Class with a pretty birthday card that combines florals, Designer Series Paper, layered die cuts, and several coordinating Stampin’ Up! products. This was one of the cards from my August Stamp-a-Stack, and it was a great opportunity to show how products from different collections can work together beautifully on one card.
There’s also quite a bit happening at Stampin’ Up! right now, so during the Live I talked about some of the current shopping opportunities, including Double Rewards, the Designer Series Paper and cardstock sale, and products on the Last Chance List.
Watch the Lily of the Valley Card Tutorial
Watch the replay above to make the card along with me and see all the little tips I shared along the way.
Starting with Valley in Bloom Designer Series Paper
The inspiration for the card’s color palette came from the Valley in Bloom Designer Series Paper.
One of the colors listed for the paper is Coastal Cabana, which you know I love. But when I looked at this particular pattern, I thought its softer, muted blue-green coordinated even better with Lost Lagoon. So, I chose Lost Lagoon for my card base instead.
That’s a good reminder that the coordinating colors listed for Designer Series Paper are a wonderful starting point, but they aren’t rules. Pull out your cardstock and see what you think looks best!
Because Lost Lagoon is fairly dark, I added a piece of White Willow cardstock inside the card to give me a nice light surface for writing my message.
A Card Layout Designed to Make the Most of Your Paper
For the card front, I used two different patterns from the Valley in Bloom DSP, cutting one piece to 3″ x 4″ and another to 2″ x 4″.
There’s actually a practical reason behind those measurements.
When I’m preparing 40 or more cards for my monthly classes, I need to get as much as possible from every sheet of Designer Series Paper. Choosing measurements that divide efficiently into a 12″ x 12″ sheet helps me minimize waste.
The two pieces don’t quite meet in the middle, so I covered the gap with a narrow strip of Granny Apple Green Two-Tone Cardstock. It looks like part of the design while helping me stretch that DSP a little farther.
Layering the Everyday Arches Dies
The Everyday Arches Dies generated a lot of interest when we made this card at Stamp-a-Stack!
They’ve been available for a while, but sometimes it takes seeing an older product used in a new way to make you notice it all over again.
I cut three arches using colors pulled from the Designer Series Paper and layered them together to create the focal point for the card.
If you’d like to reproduce the exact combination, counting from the largest die inward, I used the:
- Fourth-largest arch
- Fifth-largest arch
- Sixth-largest arch
I used Two-Tone Cardstock for the arches. Because it’s a little thinner than traditional cardstock, it’s particularly nice for a project like this where we’re already creating quite a few layers.
Stamping the Lily of the Valley
Next came our floral focal point using the Lily of the Valley Bundle.
I stamped the lily image onto White Willow cardstock using Gray Granite ink.
Gray Granite is one of my favorite choices when I want definition but don’t want the stronger contrast of black. Depending on the project, Basic Gray or Smoky Slate can accomplish a similar effect, so don’t overlook your gray inks when choosing a neutral for line-art images.
A Tip for Inking Large Stamps
Because the Lily of the Valley image is fairly large, I turned things around when I inked it.
Rather than repeatedly pressing the stamp into the ink pad, I left the stamp on my work surface and brought the ink pad to the stamp.
I find that this gives me good coverage on a larger stamp and lets me see exactly where the ink is going.
After stamping the flower, I used its coordinating die to cut it out.
I repeated the process with the leaves, this time stamping them in Granny Apple Green and cutting them with the coordinating die.
Building the Floral Arrangement
With all of our pieces prepared, assembly is quite simple.
I adhered the Lily of the Valley image diagonally across the layered arches and then tucked the leaves into the arrangement so that they look as though they’re naturally growing between the flowers.
It’s a relatively small detail, but changing the angle of a die-cut floral image can make a card feel much more relaxed and interesting than positioning everything perfectly straight.
Mixing and Matching Bundles for the Sentiment
Here’s another example of why I don’t think we should feel obligated to use only one bundle on a card.
The Happy Birthday sentiment comes from Lily of the Valley, but I wanted a different shape for the greeting. I reached for one of my favorite label dies from the Lovely Arrangements Bundle.
The sentiment fit beautifully inside it, and the angular edges provide a nice contrast to all those curved arches and organic floral shapes.
I popped the greeting up with Stampin’ Dimensionals to give the card one more layer of depth.
The Lovely Arrangements Bundle was also on the Last Chance List when I recorded this Live, so it’s worth checking availability if you’ve had your eye on those dies.
A Little Shimmer to Finish the Card
You know I like a little something sparkly on a finished card!
For this one, I used three of the green Shimmering Dots. Although another color in the package coordinates with Coastal Cabana, I chose green because I’d already shifted the card’s palette toward Lost Lagoon.
Three dots add just enough shine without competing with the flowers, paper, and layered arches.
A Great Time to Look at Your Wish List
I also spent some time during the Live talking about the different Stampin’ Up! offers happening right now.
At the time of this replay, there are several opportunities that overlap:
- Double Rewards from August 19–21, with qualifying orders earning twice the usual rewards
- 15% off select Designer Series Papers
- 15% off select Two-Tone Cardstock and cardstock
- Products available on the Last Chance List, while supplies last
The Valley in Bloom Designer Series Paper used on today’s card is one of the papers included in the 15% off sale.
With several promotions happening at once, this is a good time to look at products you’ve been considering and see whether any are included.
Try Mixing Your Crafting Supplies
One of my favorite things about this card is that no single product has to do all the work.
The Lily of the Valley Bundle provides our flowers and sentiment. Valley in Bloom DSP gives us the color palette and background. Everyday Arches creates the layered focal point. Lovely Arrangements gives us the perfect sentiment label. And a few Shimmering Dots finish everything off.
Your supplies don’t have to come from the same suite or collection to work beautifully together.
Take another look through the dies, papers, and embellishments you already own. You may discover combinations you hadn’t considered before.
Watch the replay above to see the entire card come together, along with all of my tips from this week’s Quick Class.
For info about my upcoming in-person and virtual classes, check out my class descriptions here and my calendar here. I hope to see you at a class sometime soon, but you can always find ideas here on my blog as well as on Facebook and Instagram. Subscribe to my weekly newsletter at the bottom of this page so you don’t miss a thing!
Lily of the Valley Card Measurements:
- Lost Lagoon Card Base—5 1/2” x 8 ½”, scored at 4 ¼”
- White Willow –4” x 5 ¼”, 3” x 1”, 2 ½” x 5 ¼”, 2 ½” x 4”
- Lost Lagoon – 3” x 4 ½”
- Granny Apple Green – 3” x 4”, 2 ¾” x 3 ½”, ½” x 4”
- Valley In Bloom DSP – 3” x 4” (design 1), 2” x 4” (design 2)
- Shimmering Dots – 3
Lily of the Valley Card Supplies:
![Lily Of The Valley Bundle (English) [ 167943 ]](https://assets1.tamsnetwork.com/images/EC042017NF/167943s.jpg "Lily Of The Valley Bundle (English) [ 167943 ]")
![Everyday Arches Dies [ 164629 ]](https://assets1.tamsnetwork.com/images/EC042017NF/164629s.jpg "Everyday Arches Dies [ 164629 ]")
![Lovely Arrangements Dies [ 167175 ]](https://assets1.tamsnetwork.com/images/EC042017NF/167175s.jpg "Lovely Arrangements Dies [ 167175 ]")
![Valley In Bloom 12" X 12" (30.5 X 30.5 Cm) Designer Series Paper [ 167935 ]](https://assets1.tamsnetwork.com/images/EC042017NF/167935s.jpg "Valley In Bloom 12\" X 12\" (30.5 X 30.5 Cm) Designer Series Paper [ 167935 ]")
![Lost Lagoon 8-1/2" X 11" Cardstock [ 133679 ]](https://assets1.tamsnetwork.com/images/EC042017NF/133679s.jpg "Lost Lagoon 8-1/2\" X 11\" Cardstock [ 133679 ]")
![White Willow 12" X 12" (30.5 X 30.5 Cm) Cardstock [ 166703 ]](https://assets1.tamsnetwork.com/images/EC042017NF/166703s.jpg "White Willow 12\" X 12\" (30.5 X 30.5 Cm) Cardstock [ 166703 ]")
![Granny Apple Green 12" X 12" (30.5 X 30.5 Cm) Two Tone Cardstock [ 166663 ]](https://assets1.tamsnetwork.com/images/EC042017NF/166663s.jpg "Granny Apple Green 12\" X 12\" (30.5 X 30.5 Cm) Two Tone Cardstock [ 166663 ]")
![Lost Lagoon Classic Stampin' Pad [ 161678 ]](https://assets1.tamsnetwork.com/images/EC042017NF/161678s.jpg "Lost Lagoon Classic Stampin' Pad [ 161678 ]")
![Granny Apple Green Stampin' Pad [ 147095 ]](https://assets1.tamsnetwork.com/images/EC042017NF/147095s.jpg "Granny Apple Green Stampin' Pad [ 147095 ]")
![Gray Granite Classic Stampin' Pad [ 147118 ]](https://assets1.tamsnetwork.com/images/EC042017NF/147118s.jpg "Gray Granite Classic Stampin' Pad [ 147118 ]")
![Shimmering Dots [ 167949 ]](https://assets1.tamsnetwork.com/images/EC042017NF/167949s.jpg "Shimmering Dots [ 167949 ]")
![Stampin' Cut & Emboss Machine [ 149653 ]](https://assets1.tamsnetwork.com/images/EC042017NF/149653s.jpg "Stampin' Cut & Emboss Machine [ 149653 ]")
![Stampin' Dimensionals [ 104430 ]](https://assets1.tamsnetwork.com/images/EC042017NF/104430s.jpg "Stampin' Dimensionals [ 104430 ]")
![Bone Folder [ 102300 ]](https://assets1.tamsnetwork.com/images/EC042017NF/102300s.jpg "Bone Folder [ 102300 ]")
![Stampin' Seal [ 152813 ]](https://assets1.tamsnetwork.com/images/EC042017NF/152813s.jpg "Stampin' Seal [ 152813 ]")
![Take Your Pick [ 144107 ]](https://assets1.tamsnetwork.com/images/EC042017NF/144107s.jpg "Take Your Pick [ 144107 ]")
![Multipurpose Liquid Glue [ 110755 ]](https://assets1.tamsnetwork.com/images/EC042017NF/110755s.jpg "Multipurpose Liquid Glue [ 110755 ]")
0 Comments