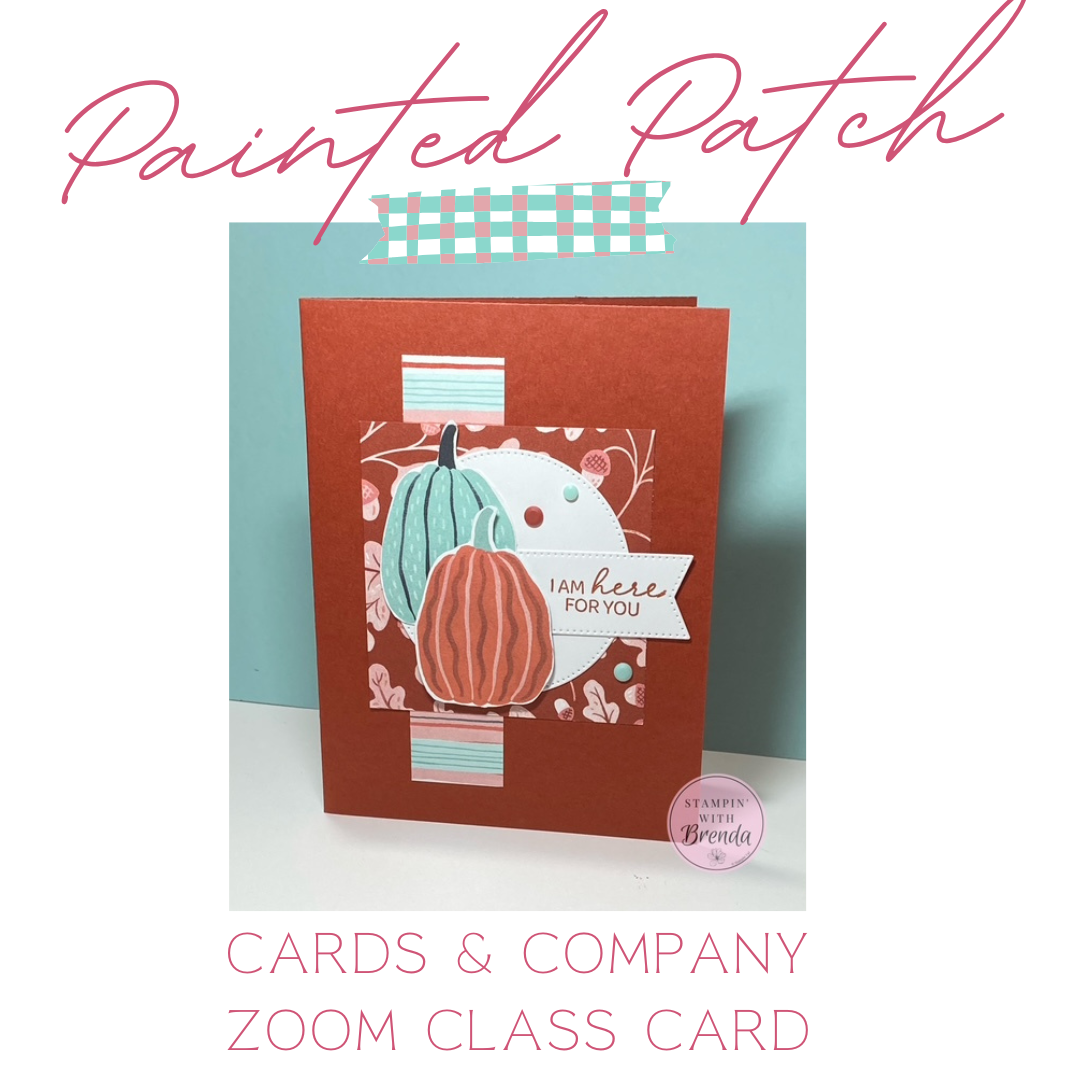
The Painted Patch Designer Series Paper brings some unexpected colors to fall crafting, and I love the fresh look! In this week’s Quick Class, I used this new Stampin’ Up! paper to create a fall-themed card featuring fussy-cut pumpkins, simple stitched shapes, and the sweet “I’m here for you” sentiment. Even better, you don’t need the coordinating Painted Patch Bundle to make this card because the Designer Series Paper does most of the work for us.
This project is also a sneak peek at one of the cards we’ll be making in my upcoming Cards & Company To Go Zoom Class, so be sure to watch the replay and read on for all the details.
Watch the Painted Patch Card Tutorial
In the replay, I’ll show you how I created the card from beginning to end, including tips for fussy cutting the pumpkins, creating a strong focal point, and using overlapping elements to tie your card design together.
A Fresh Color Palette for Fall
The Painted Patch Designer Series Paper is one of the new products that became available this month, and the color palette immediately caught my attention.
Of course, there are some of the warm colors we expect for fall, including Cajun Craze, but there are also some fun surprises. Pool Party and other blue-green shades appear alongside the traditional autumn colors.
I love that combination because it gives us a completely different way to approach fall cards. And if pumpkins aren’t your thing, the reverse sides include some great neutral and versatile patterns, too.
Let the Designer Series Paper Be the Star
I don’t own the complete Painted Patch Suite. I have the Designer Series Paper, and for this card that’s really all I needed!
The suite does include a coordinating stamp and die bundle, stencils, Calypso Coral ribbon, Painted Patch Adhesive-Backed Dots, and the Rustic Check 3D Embossing Folder.
But one of the sheets of Designer Series Paper is filled with pumpkins that are easy to cut out with a good pair of Paper Snips.
So that’s exactly what I did.
It’s a good reminder that you don’t always need to own an entire suite to create a project you love. Sometimes one package of Designer Series Paper gives you plenty to work with.
An Easy Layout That Highlights a Focal Point
I started with a standard Cajun Craze A2 card base, measuring 8-1/2″ x 5-1/2″ and folded in half.
Because Cajun Craze is fairly dark, I added White Willow cardstock inside the card to create a light surface for writing a message.
For the front, I used a striped Painted Patch DSP pattern along with a coordinating cardstock panel.
This is a layout I return to quite often because it creates a simple background while leaving plenty of room for a strong focal point.
And on this card, those pumpkins definitely deserve the attention!
Using Stitched Shapes to Ground the Design
To create a place for my pumpkins, I die cut a larger shape from White Willow cardstock using the Stitched Shapes Dies.
These are the kinds of dies I reach for again and again. Basic circles, squares, labels, and banners might not be the flashiest products in the craft room, but they’re incredibly useful when you’re building card layouts.
The white shape also gives our colorful pumpkins some breathing room. Instead of competing with the striped Designer Series Paper behind them, they have a clean background that helps them stand out.
Fussy Cutting the Painted Patch Pumpkins
For the focal point, I selected pumpkins directly from the Painted Patch DSP and cut them out by hand.
If fussy cutting isn’t your favorite thing, here’s the trick I demonstrated during the Live:
Move the paper, not the scissors.
Keep your scissors relatively steady and slowly rotate the paper as you cut around the image. A small, sharp pair of scissors makes this much easier.
You also don’t have to cut absolutely perfectly along every little edge. Once the pumpkin is on the finished card, no one is going to inspect your cutting with a magnifying glass!
I chose pumpkins in different colors, including one of the unexpected Pool Party pumpkins, to create my little fall arrangement.
Add Dimension to the Pumpkin Arrangement
Rather than adhering all of the pumpkins flat, I created a little depth in the arrangement.
One pumpkin is adhered directly to the card, while another is raised with Stampin’ Dimensionals.
That tiny difference in height helps separate the individual shapes and makes the focal point much more interesting.
It’s such an easy technique, but it’s one you can use anytime you’re grouping flowers, leaves, balloons, presents, or other die-cut and fussy-cut images.
“I’m Here for You”
For the greeting, I used the Sending Salutations stamp set.
This set has some less-common sentiments that I find particularly useful, including greetings for health and healing, achievements, weddings, graduations, and other occasions.
For this card I chose:
I’m here for you
I stamped it in Cajun Craze onto a small White Willow banner cut with the Stitched Shapes Dies.
Instead of placing the banner completely separate from the pumpkins, I tucked it into the arrangement so the elements overlap.
During the Live, I talked about “breaking the plane” by allowing different parts of your design to cross into one another. That overlap creates continuity and helps the individual pieces feel like one cohesive focal point rather than several unrelated elements floating on the card.
Finish with Painted Patch Adhesive-Backed Dots
The final touch is a little embellishment.
I used the coordinating Painted Patch Adhesive-Backed Dots in Cajun Craze and Pool Party, arranging three of them in a visual triangle.
You know I love my groups of three!
Repeating the colors already found in the Designer Series Paper is an easy way to finish the card without introducing anything that competes with our pumpkins.
Make This Card in Cards & Company To Go
This card is one of the three designs featured in my September Cards & Company To Go Zoom Class.
We’ll make six cards total, two each of three designs, and your class package includes the pre-cut supplies you’ll need for the projects.
You’ll also receive:
- Half a package of Painted Patch Designer Series Paper to use during class and have plenty left for future projects
- A full package of Painted Patch Adhesive-Backed Dots
- A PDF tutorial
- Access to the video replay if you can’t attend live
We’ll meet via Zoom on Tuesday, September 29 at 7:00 PM Eastern. Registration closes Tuesday, September 15 so I have enough time to prepare and ship everyone’s supplies before class.
I’ll be sharing the other two card designs on social media before the registration deadline, so keep an eye out for those!
Try Looking at Your Designer Series Paper Differently
One of my favorite things about this project is how much of the card comes directly from the Designer Series Paper.
We used one pattern as our background and another almost like a package of die cuts, simply cutting out the pumpkins we wanted.
Next time you open a package of DSP, don’t just look at it as background paper. Look for flowers, animals, leaves, pumpkins, or other images that could become the focal point of your card.
You may already have a whole collection of embellishments hiding in your paper stash!
Watch the replay above to see the complete card come together, and if you’d like to make this one along with me, be sure to register for Cards & Company To Go by September 15.
For info about my upcoming in-person and virtual classes beyond my Ultimate Christmas Card Class , check out my class descriptions here and my calendar here. I hope to see you at a class sometime soon, but you can always find ideas here on my blog as well as on Facebook and Instagram. Subscribe to my weekly newsletter at the bottom of this page so you don’t miss a thing!
Painted Patch Card Measurements:
- Cajun Craze Card Base—5 1/2” x 8 ½”, scored at 4 ¼”
- White Willow –4” x 5 ¼”, 2 ¾” x 2 ¾”, 1” x 2 ¼”
- Painted Patch DSP – 1” x 4 ½”, 3” x 3”, pumpkins
- Painted Patch Adhesive Backed Dots – 3
Painted Patch Card Supplies:
![Sending Salutations Photopolymer Stamp Set (English) [ 167857 ]](https://assets1.tamsnetwork.com/images/EC042017NF/167857s.jpg "Sending Salutations Photopolymer Stamp Set (English) [ 167857 ]")
![Painted Patch 12" X 12" (30.5 X 30.5 Cm) Designer Series Paper [ 168430 ]](https://assets1.tamsnetwork.com/images/EC042017NF/168430s.jpg "Painted Patch 12\" X 12\" (30.5 X 30.5 Cm) Designer Series Paper [ 168430 ]")
![Cajun Craze 8-1/2" X 11" Cardstock [ 119684 ]](https://assets1.tamsnetwork.com/images/EC042017NF/119684s.jpg "Cajun Craze 8-1/2\" X 11\" Cardstock [ 119684 ]")
![White Willow 12" X 12" (30.5 X 30.5 Cm) Cardstock [ 166703 ]](https://assets1.tamsnetwork.com/images/EC042017NF/166703s.jpg "White Willow 12\" X 12\" (30.5 X 30.5 Cm) Cardstock [ 166703 ]")
![Cajun Craze Classic Stampin' Pad [ 147085 ]](https://assets1.tamsnetwork.com/images/EC042017NF/147085s.jpg "Cajun Craze Classic Stampin' Pad [ 147085 ]")
![Stitched Shapes Dies [ 152323 ]](https://assets1.tamsnetwork.com/images/EC042017NF/152323s.jpg "Stitched Shapes Dies [ 152323 ]")
![Painted Patch Adhesive Backed Dots [ 168443 ]](https://assets1.tamsnetwork.com/images/EC042017NF/168443s.jpg "Painted Patch Adhesive Backed Dots [ 168443 ]")
![Stampin' Cut & Emboss Machine [ 149653 ]](https://assets1.tamsnetwork.com/images/EC042017NF/149653s.jpg "Stampin' Cut & Emboss Machine [ 149653 ]")
![Bone Folder [ 102300 ]](https://assets1.tamsnetwork.com/images/EC042017NF/102300s.jpg "Bone Folder [ 102300 ]")
![Stampin' Seal [ 152813 ]](https://assets1.tamsnetwork.com/images/EC042017NF/152813s.jpg "Stampin' Seal [ 152813 ]")
![Take Your Pick [ 144107 ]](https://assets1.tamsnetwork.com/images/EC042017NF/144107s.jpg "Take Your Pick [ 144107 ]")
![Stampin' Dimensionals [ 104430 ]](https://assets1.tamsnetwork.com/images/EC042017NF/104430s.jpg "Stampin' Dimensionals [ 104430 ]")
![Detail Scissors [ 170902 ]](https://assets1.tamsnetwork.com/images/EC042017NF/170902s.jpg "Detail Scissors [ 170902 ]")
0 Comments