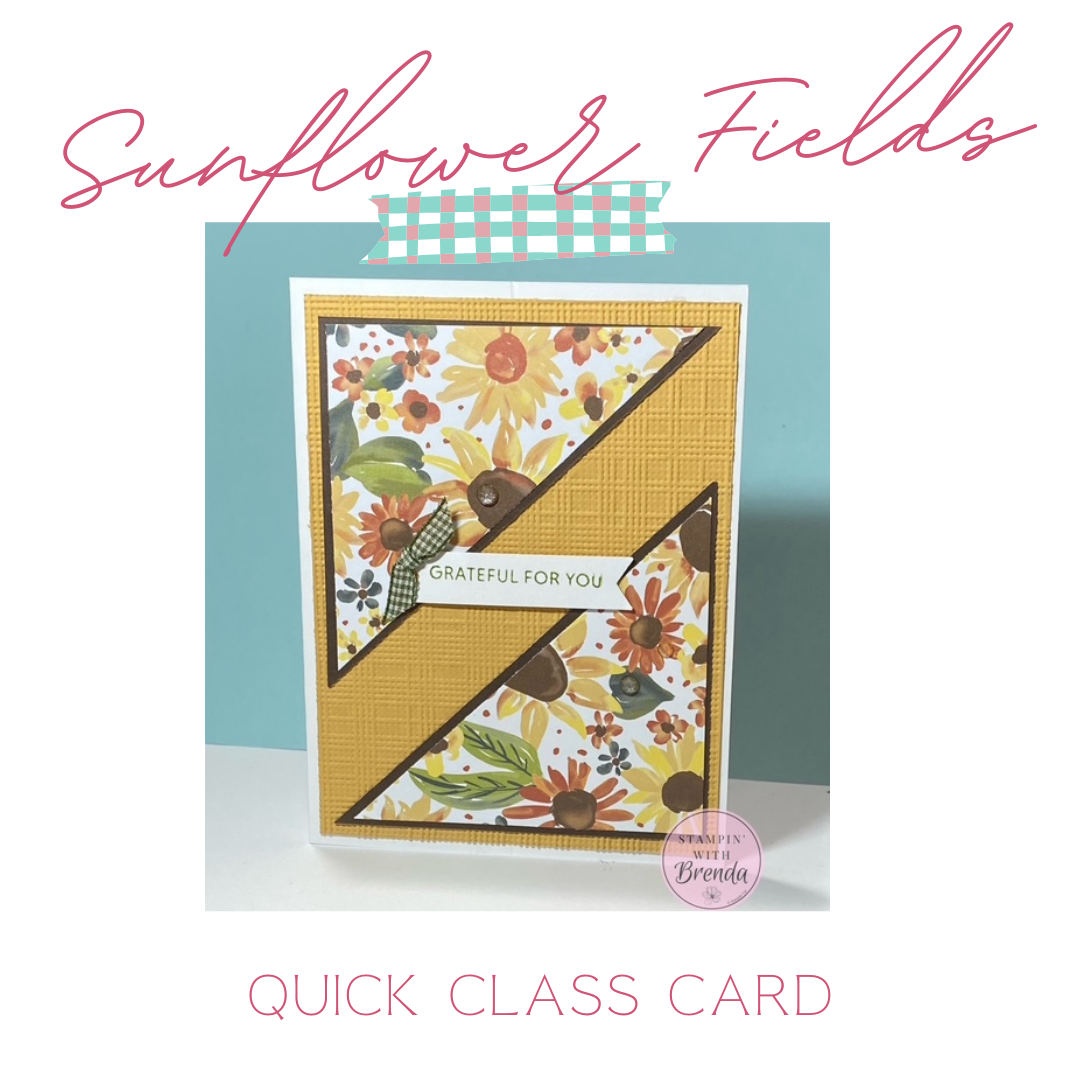
The Sunflower Fields Designer Series Paper is the star of this week’s Quick Class, and this card gives us a fun way to show off its gorgeous patterns. I paired the paper with warm Golden Glow and Early Espresso cardstock, added plenty of texture, and used a simple diagonal-cutting technique to create the two large triangle panels. The result is a fall card that looks a little different but is surprisingly straightforward to make.
This card is also one of the designs we’re making at my September Stamp-a-Stack, so if you’re joining me in class this week, consider this your sneak peek!
Watch the Sunflower Fields Card Tutorial
Watch the replay above to see exactly how I cut the triangle panels, plus several cardmaking tips for working with embossed cardstock, punches, ribbon, and embellishments.
Gorgeous Sunflower Fields Designer Series Paper
I’ve shared some of the Sunflower Fields Designer Series Paper before, but I couldn’t resist using it again for this card.
The package includes beautiful sunflower imagery along with coordinating patterns in rich, warm colors that work wonderfully for fall. Although there is a coordinating bundle available, I don’t own it yet. And for this project, I really don’t need it.
The Designer Series Paper provides all the pattern and interest we need.
That’s something worth remembering when you’re looking at a new suite of products. You don’t necessarily need to own every coordinating product to create beautiful cards. Sometimes the paper is enough to inspire an entire project.
Add Texture with the Softly Woven Embossing Folder
I started with Thick Basic White cardstock for the card base. I generally prefer the thicker cardstock for my card bases because it gives the finished card a little more structure.
Next comes a layer of Golden Glow Two-Tone Cardstock embossed with the Softly Woven 3D Embossing Folder.
This folder creates a subtle grid-like texture that makes a huge difference on an otherwise simple piece of cardstock. It’s one of those little details that dresses up the entire card without competing with the Designer Series Paper.
A Tip for Adhering Embossed Cardstock
Whenever I adhere an embossed layer, I like to use liquid adhesive because it can settle into all those little textured areas.
But don’t put the glue too close to the edges!
When you press the cardstock onto the card, the adhesive naturally spreads. Leaving a little space around the perimeter helps prevent it from seeping out and leaving you with sticky edges.
The Softly Woven folder creates quite a bit of texture, so the cardstock may also curl slightly after embossing. Give it a good press as you adhere it to help everything lie flat.
The Trick: Creating the Triangle Panels
Now we get to the fun part of this card.
Instead of using traditional rectangular layers, we’re going to create two large triangles.
I started with an Early Espresso piece measuring 3 3/4″ x 3 1/2″ and a piece of Sunflower Fields DSP that’s 1/4″ smaller.
Here’s the important part: don’t layer them together yet.
We’re going to cut each piece separately from corner to corner.
Place the slightly longer edge at the top of your paper trimmer. Position one corner directly in the cutting channel, then line up the opposite corner in the same channel. Hold the cardstock securely so it doesn’t shift and cut straight through.
Now you have two triangles.
Repeat the same process with the Designer Series Paper.
Because the DSP started out slightly smaller than the Early Espresso cardstock, the triangles will layer together with a narrow Early Espresso border showing around the edges.
It’s a simple cutting technique, but it creates a completely different look from the rectangular layers we use so often.
Why Cut the DSP Separately?
You might wonder why we don’t adhere the Designer Series Paper to the Early Espresso cardstock first and then cut everything at once.
Cutting the pieces separately gives us that pretty border all the way around each triangle.
And there’s another reason I like cutting the DSP pieces together from the same original rectangle: the patterns still relate to one another when they’re placed on opposite ends of the card.
It’s a small detail that helps the finished design feel cohesive.
Let Some of That Embossing Show
Once the triangles are layered, one goes toward the top of the card and the other toward the bottom.
Rather than making them meet in the middle, I intentionally leave an open strip between them.
That gives us another glimpse of the Golden Glow embossed background and keeps the design from becoming too busy.
You could actually stop there and use the open area for a stamped sentiment. But, of course, I had a new stamp set I wanted to use!
A “Grateful for You” Sentiment
For the greeting, I used the new Soiree Salutations stamp set.
It has a nice variety of greetings for the coming months, including Halloween and holiday sentiments, but it also contains several greetings that can be used throughout the year.
For this card, I chose:
Grateful for You
It’s perfect for fall, Thanksgiving, or simply letting someone know you appreciate them.
I stamped it onto White Willow cardstock and punched it out with the coordinating banner punch.
A Helpful Tip for Using the Banner Punch
I discovered something interesting while working with this punch.
Trying to conserve cardstock by inserting a piece that’s only slightly larger than the shape being punched can sometimes cause the punch to stick.
Instead, I recommend using a wider strip of cardstock that allows the punch to cut through the areas above and below the shape as well.
It may seem like you’re wasting a tiny bit of paper, but I’ve found that the punch releases much more easily.
And if you ever have a metal punch become completely stuck, I shared another trick in the replay: try putting it in the freezer for about 10 minutes. The cold can cause the metal to contract slightly, which may help the mechanism release.
“Breaking the Plane” in Your Card Design
Instead of simply centering the sentiment inside that open strip, I positioned it so that it overlaps the other elements slightly.
This is a design concept sometimes called breaking the plane.
In simple terms, rather than having every element sit neatly within its own separate area, allow one piece to overlap or cross into another. Those little connections help guide your eye around the card and can make the design feel more cohesive.
It’s something I’ve naturally done on cards for years, but now I finally have a name for it!
A Little Gingham Ribbon
Next, I added a tiny accent using Mossy Meadow Gingham Ribbon.
Rather than making a full bow, I simply tied a knot in a short piece of ribbon, trimmed the ends, and attached it to the corner of the sentiment with a Glue Dot.
This is a great way to add ribbon without covering up too much of your Designer Series Paper.
And because we’re using only a small piece, it’s also a nice way to stretch your ribbon supply.
Finish with Radiant Gems
Naturally, we need a little bling!
I finished the card with the new Radiant Gems, choosing yellow and green to coordinate with the Sunflower Fields paper.
I arranged three gems in a visual triangle, placing one toward the upper portion of the design and two lower on the card.
Using three embellishments this way helps your eye travel around the card and gives the finished design a nice sense of balance.
Make This Card at September Stamp-a-Stack
This is one of the five designs we’re making at my September Stamp-a-Stack here in Basking Ridge, New Jersey.
We’ll make two each of five designs for a total of 10 cards, and I still have some openings this week.
Class times are:
- Thursday at 10:00 AM
- Friday at 10:00 AM
- Friday at 7:00 PM
- Saturday at 10:00 AM
If you’re local and would like to join us, reach out to me for availability and registration information.
Try the Triangle Technique with Your Own Designer Series Paper
The thing I especially like about this card is that the layout isn’t limited to sunflowers or fall.
Once you know how to create those layered triangles, you can recreate this design with almost any Designer Series Paper in your collection.
Try changing the paper, background color, sentiment, and embellishments, and suddenly the same layout could become a birthday card, Christmas card, thank-you card, or almost anything else.
Watch the replay above to see the diagonal cutting technique in action and get all my tips for putting the card together.
For info about my upcoming in-person and virtual classes beyond my Ultimate Christmas Card Class , check out my class descriptions here and my calendar here. I hope to see you at a class sometime soon, but you can always find ideas here on my blog as well as on Facebook and Instagram. Subscribe to my weekly newsletter at the bottom of this page so you don’t miss a thing!
Sunflower Fields Card Measurements:
- Thick Basic White Card Base—5 1/2” x 8 ½”, scored at 4 ¼”
- White Willow – 1 ½” x 3”
- Golden Glow Two-Toned – 4” x 5 ¼”
- Early Espresso Two-Toned – 3 ¾” x 3 ½”
- Sunflower Fields DSP – 3 ½” x 3 ¼”
- Radiant Gems – 3
- Mossy Meadow Gingham Ribbon – 4”
Sunflower Fields Card Supplies:
![Soiree Salutations Photopolymer Stamp Set (English) [ 168337 ]](https://assets1.tamsnetwork.com/images/EC042017NF/168337s.jpg "Soiree Salutations Photopolymer Stamp Set (English) [ 168337 ]")
![Sunflower Fields 12" X 12" (30.5 X 30.5 Cm) Designer Series Paper [ 168351 ]](https://assets1.tamsnetwork.com/images/EC042017NF/168351s.jpg "Sunflower Fields 12\" X 12\" (30.5 X 30.5 Cm) Designer Series Paper [ 168351 ]")
![Softly Woven 3 D Embossing Folder [ 168466 ]](https://assets1.tamsnetwork.com/images/EC042017NF/168466s.jpg "Softly Woven 3 D Embossing Folder [ 168466 ]")
![Basic White 8 1/2" X 11" Thick Cardstock [ 159229 ]](https://assets1.tamsnetwork.com/images/EC042017NF/159229s.jpg "Basic White 8 1/2\" X 11\" Thick Cardstock [ 159229 ]")
![White Willow 12" X 12" (30.5 X 30.5 Cm) Cardstock [ 166703 ]](https://assets1.tamsnetwork.com/images/EC042017NF/166703s.jpg "White Willow 12\" X 12\" (30.5 X 30.5 Cm) Cardstock [ 166703 ]")
![Early Espresso 12" X 12" (30.5 X 30.5 Cm) Two Tone Cardstock [ 166668 ]](https://assets1.tamsnetwork.com/images/EC042017NF/166668s.jpg "Early Espresso 12\" X 12\" (30.5 X 30.5 Cm) Two Tone Cardstock [ 166668 ]")
![Golden Glow 12" X 12" (30.5 X 30.5 Cm) Two Tone Cardstock [ 167695 ]](https://assets1.tamsnetwork.com/images/EC042017NF/167695s.jpg "Golden Glow 12\" X 12\" (30.5 X 30.5 Cm) Two Tone Cardstock [ 167695 ]")
![Mossy Meadow Classic Stampin' Pad [ 147111 ]](https://assets1.tamsnetwork.com/images/EC042017NF/147111s.jpg "Mossy Meadow Classic Stampin' Pad [ 147111 ]")
![Three Banner Punch [ 167050 ]](https://assets1.tamsnetwork.com/images/EC042017NF/167050s.jpg "Three Banner Punch [ 167050 ]")
![Radiant Gems [ 168363 ]](https://assets1.tamsnetwork.com/images/EC042017NF/168363s.jpg "Radiant Gems [ 168363 ]")
![Mossy Meadow & Very Vanilla 1/4" (6.4 Mm) Gingham Ribbon [ 168364 ]](https://assets1.tamsnetwork.com/images/EC042017NF/168364s.jpg "Mossy Meadow & Very Vanilla 1/4\" (6.4 Mm) Gingham Ribbon [ 168364 ]")
![Stampin' Cut & Emboss Machine [ 149653 ]](https://assets1.tamsnetwork.com/images/EC042017NF/149653s.jpg "Stampin' Cut & Emboss Machine [ 149653 ]")
![Bone Folder [ 102300 ]](https://assets1.tamsnetwork.com/images/EC042017NF/102300s.jpg "Bone Folder [ 102300 ]")
![Stampin' Seal [ 152813 ]](https://assets1.tamsnetwork.com/images/EC042017NF/152813s.jpg "Stampin' Seal [ 152813 ]")
![Take Your Pick [ 144107 ]](https://assets1.tamsnetwork.com/images/EC042017NF/144107s.jpg "Take Your Pick [ 144107 ]")
![Stampin' Dimensionals [ 104430 ]](https://assets1.tamsnetwork.com/images/EC042017NF/104430s.jpg "Stampin' Dimensionals [ 104430 ]")
![Mini Glue Dots [ 103683 ]](https://assets1.tamsnetwork.com/images/EC042017NF/103683s.jpg "Mini Glue Dots [ 103683 ]")
![Multipurpose Liquid Glue [ 110755 ]](https://assets1.tamsnetwork.com/images/EC042017NF/110755s.jpg "Multipurpose Liquid Glue [ 110755 ]")
0 Comments