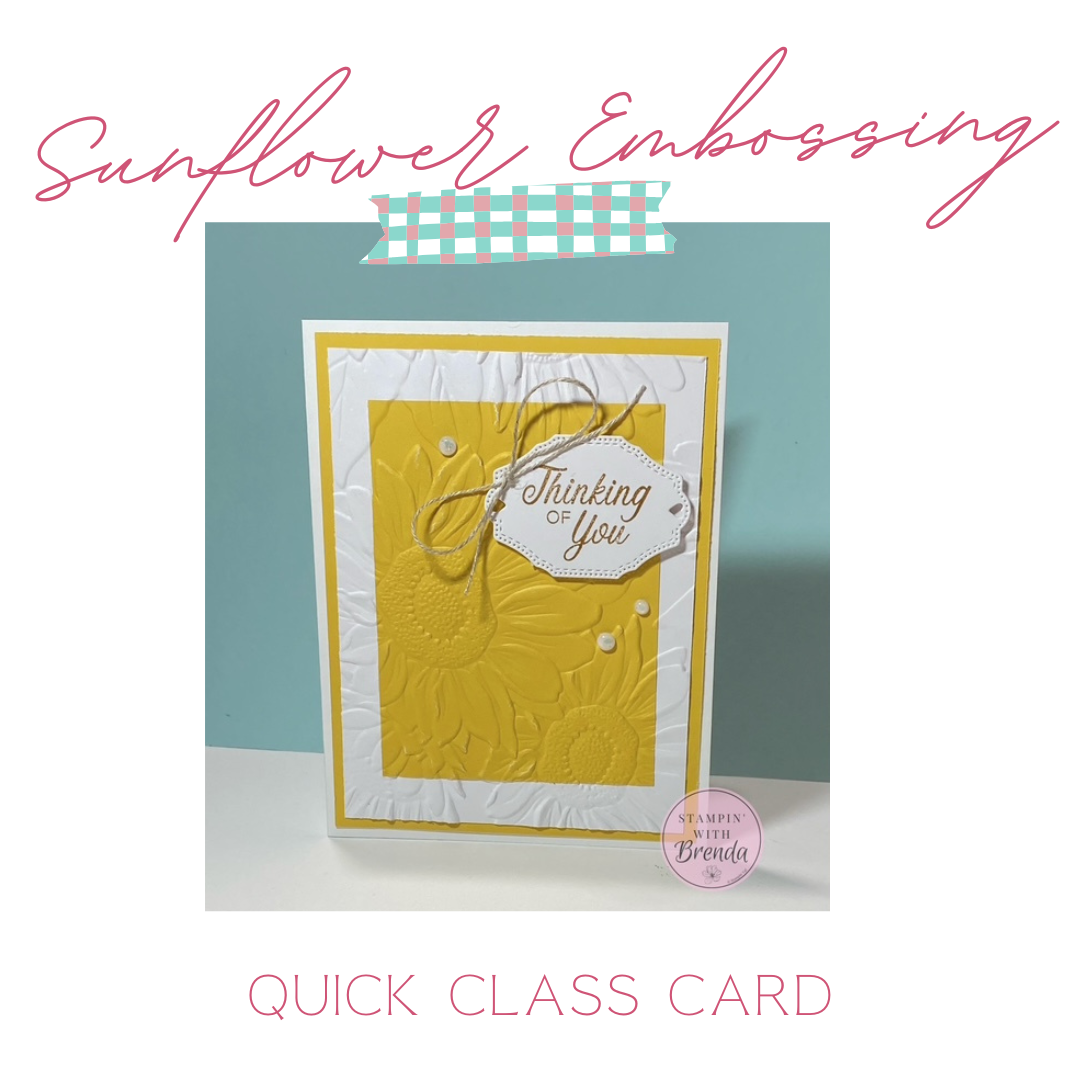
The Sunflower 3D Embossing Folder is the star of this week’s Quick Class, and I’m bringing back a technique I haven’t used in a long time. Instead of simply embossing a single piece of cardstock, we’re layering two colors together first and then running them through the embossing folder at the same time. The result is a beautiful embedded embossed look where the sunflower design flows continuously across both layers.
This card was one of the most popular designs at my September Stamp-a-Stack, and I can see why. With just Crushed Curry and white cardstock, a simple sentiment, linen thread, and a little sparkle, the embossing gets to do all the work.
Watch the Sunflower 3D Embossing Folder Tutorial
Watch the replay above to see exactly how the embedded embossing technique works. I also share an important tip about which adhesive to use before embossing, the correct sandwich for a 3D embossing folder, and a few tricks for finishing your card.
A Simple Crushed Curry and White Color Combination
One of the things I love about this card is how little you need to create it.
I started with a Basic White card base and added a layer of Crushed Curry Two-Tone Cardstock. Because Two-Tone Cardstock gives you a lighter and darker version of the same color, you can choose whichever side works best for your project.
For this card, I preferred the lighter side.
From there, we need another piece of white cardstock and a smaller piece of Crushed Curry. These two pieces are where the fun begins.
How to Create the Embedded Embossing Technique
Before putting the cardstock into the Sunflower 3D Embossing Folder, I adhered the smaller Crushed Curry piece directly onto the white cardstock.
Then the two layers go through the embossing folder together.
When they come out, the sunflower 3D design has been embossed across both pieces at the same time. The raised pattern continues from the white cardstock right onto the Crushed Curry layer, making the two pieces look almost as though they have become one.
It’s such a simple idea, but the finished effect is beautiful.
And because the Sunflower 3D Embossing Folder is oversized, you can choose exactly which portion of the sunflower design you want to feature. Depending on the size of your pieces, you may even be able to emboss two pieces side by side.
Important: Use Dry Adhesive Before Embossing
This is one place where your choice of adhesive really matters.
Normally, you’ll often see me reach for liquid glue, but don’t use wet adhesive when attaching these two layers before embossing.
Instead, use a dry tape adhesive such as Stampin’ Seal.
Why?
The pressure of running the cardstock through the embossing machine can squeeze wet glue out from between the layers. Not only could that leave sticky residue on your project, but the glue could also transfer to the inside of your embossing folder.
For this technique, dry adhesive first. We’ll save the liquid glue for later.
A 3D Embossing Folder Tip You Don’t Want to Miss
During the Live, I also shared an important reminder about using 3D embossing folders with the Stampin’ Cut & Emboss Machine.
Your embossing folder should be positioned correctly between the platform and the Specialty Plate according to the machine’s embossing sandwich.
Why am I emphasizing this?
We had a little mishap at Stamp-a-Stack when the plates were accidentally put in the wrong order, and my Sunflower 3D embossing folder came out permanently warped!
The good news is that the folder still works. But I’d rather you learn from my experience than warp one of your own.
You can see the warped folder in the replay and hear my explanation of how I set up my embossing sandwich.
Now It’s Time for the Liquid Glue
Once the two layers have been embossed together, I switch back to liquid adhesive to attach the finished embossed panel to the card.
This time, liquid glue is helpful because the back of our embossed cardstock is no longer perfectly flat. The liquid adhesive can settle into the textured surface and help create a good bond.
After adhering it, hold the panel in place for a few seconds to give the glue a chance to grab.
Mix and Match Your Dies and Stamps
For the sentiment, I did something I do all the time: I mixed products from different collections.
The label comes from the Sweet Words and Labels Dies, while the “Thinking of You” greeting comes from Phrases and Frames.
I love having a good collection of basic labels because there’s no rule that says the die and sentiment have to come from the same bundle!
The Sweet Words and Labels Dies include a particularly cute label with tiny heart details at the ends. Just remember to remove those little heart pieces from the die after cutting. If scraps build up inside those small openings, the die may not cut as cleanly the next time you use it.
I stamped the sentiment in Pecan Pie, which works beautifully with the warm Crushed Curry cardstock.
My Trick for Tying Linen Thread Bows
Next, I added a simple Linen Thread bow.
If you’ve ever pulled Linen Thread from the roll, you know it wants to curl. Here’s my trick: run it between your thumbnail and forefinger a few times before tying. That helps straighten it out and makes it easier to work with.
I also like to tie my bow while the thread is still attached to the roll.
That way, if the bow doesn’t cooperate on the first try, I can untie it and start again without discovering that I’ve cut my piece too short. Once I’m happy with the bow, I trim it from the roll and attach it with a Glue Dot.
Finish with a Little Shimmer
Of course, I couldn’t leave the card without a little bling.
I used three white Shimmering Dots, arranging them in a visual triangle around the card.
The white dots add just a touch of sparkle without distracting from all that gorgeous sunflower texture.
Try This Technique with Other Embossing Folders
Here’s where this project gets especially fun.
The Sunflower 3D Embossing Folder is beautiful, but the technique isn’t limited to sunflowers.
Look through the embossing folders you already own and imagine the possibilities. You could change the colors and folder to create cards for:
- Christmas
- Birthdays
- Weddings
- Sympathy or thinking-of-you cards
- Fall
- Spring
The key is choosing an embossing pattern that will look interesting as it travels across both cardstock layers.
Once you understand the technique, you can create an entirely different card simply by changing the embossing folder, colors, and greeting.
Thinking About Christmas Cards?
I mentioned during the Live that I think this embedded embossing technique could make some really beautiful Christmas cards.
And if Christmas cards are already on your mind, registration for my Ultimate Christmas Card Class is now open!
You’ll make 20 Christmas cards, two each of 10 different designs, with prepared kits, PDF tutorials, and individual video tutorials so you can work at your own pace.
You can find all the details and registration information here.
Give Embedded Embossing a Try
Sometimes the best techniques are the ones we haven’t used in a while.
I love how something as simple as embossing two layers of cardstock together can create such an interesting finished look. There’s no complicated stamping, coloring, or die-cut focal point needed. The texture becomes the focal point.
Watch the replay above to see the technique in action, and then pull out an embossing folder from your own collection and give it a try.
I’d love to know which embossing folder you’d use!
For info about my upcoming in-person and virtual classes beyond my Ultimate Christmas Card Class , check out my class descriptions here and my calendar here. I hope to see you at a class sometime soon, but you can always find ideas here on my blog as well as on Facebook and Instagram. Subscribe to my weekly newsletter at the bottom of this page so you don’t miss a thing!
0 Comments