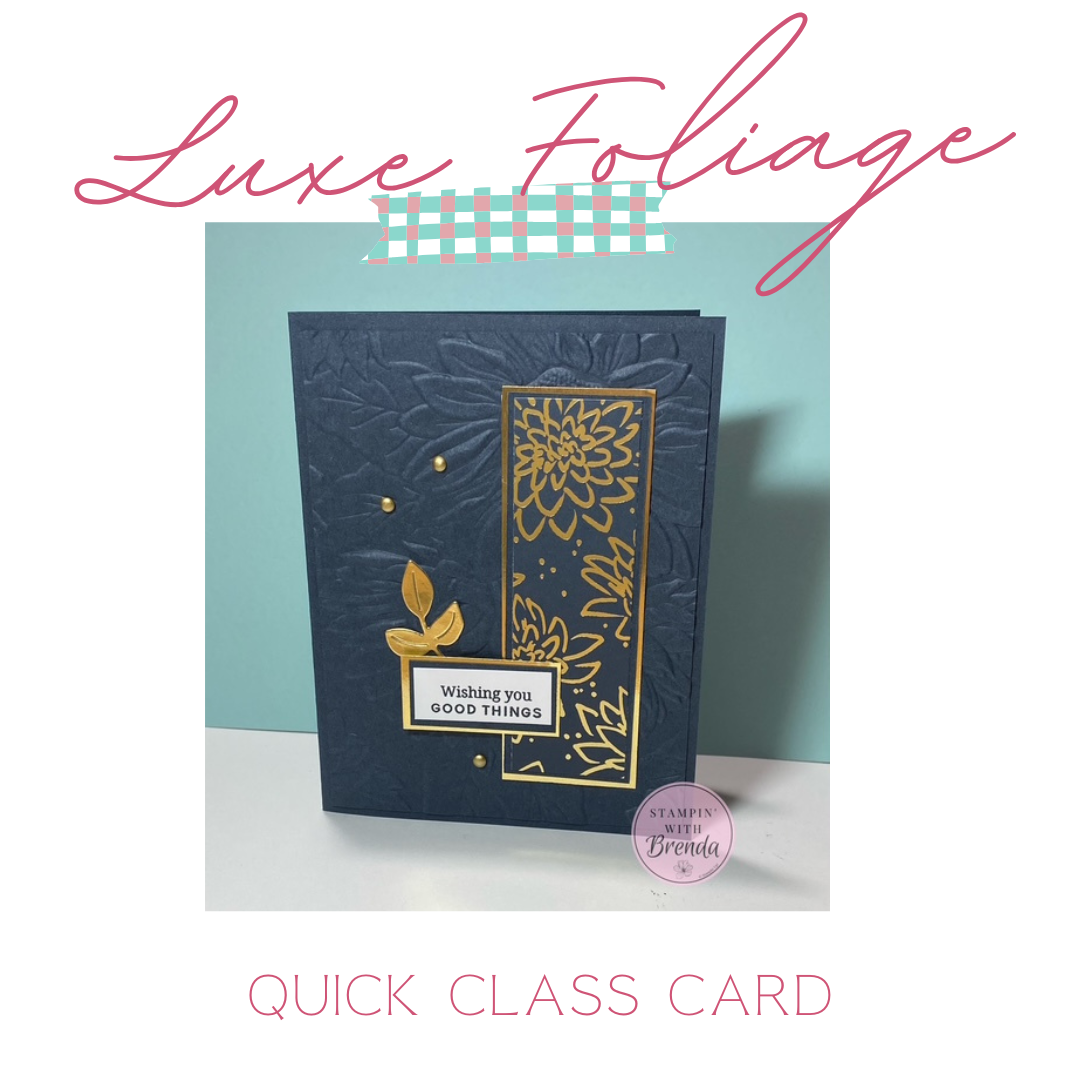
Luxe Foliage Designer Series Paper takes center stage on this elegant Secret Sea and gold handmade card, and I have to give credit for the beautiful design inspiration to fellow Stampin’ Up! demonstrator Susan Campfield. Susan graciously shared a card with a very similar layout, and I loved its classy look so much that I knew I wanted to share it with my customers.
For my Weekly Quick Class, I paired the gorgeous gold accents in the Luxe Foliage paper with Secret Sea cardstock, Gold Foil, and the Sunflower 3D Embossing Folder. The combination of texture, narrow layers, and metallic details gives the card a rich look without making it difficult to create.
This card is also a preview of one of the projects we’ll be making at my upcoming Stamp-a-Stack classes in Basking Ridge, New Jersey.
Luxe Foliage Designer Series Paper
The star of this card is definitely the Luxe Foliage DSP.
This specialty paper includes 12 sheets, with four sheets each of three different color designs, all accented with beautiful gold. As I showed during the video, that little bit of shine makes it easy to create a card that looks much more elaborate than it actually is.
Luxe Foliage is the September Stampin’ Up! Product of the Month and, while supplies last, can be purchased for $5 with a qualifying $75 order.
Adding Texture with the Sunflower 3D Embossing Folder
Rather than adhering the decorative pieces directly to the Secret Sea card base, I added another layer of Secret Sea cardstock embossed with the Sunflower 3D Embossing Folder.
I love that tone-on-tone effect. The color stays simple, but the embossed layer gives the background so much more depth and makes the finished card feel especially rich.
Quick cardmaking tip: When adhering an embossed or heavily textured layer, I prefer liquid adhesive rather than tape adhesive. The liquid glue can get into those little nooks and crannies and give the layer a stronger hold.
Don’t Waste That Gold Foil!
Here’s another little trick from this project.
Before assembling the layered panel, I die cut the small gold leaf from the Gold Foil piece that would eventually be covered by the other layers.
Why cut into a brand-new piece of Gold Foil when no one is ever going to see what’s underneath?
The little leaf was cut using a die from the Boutique Blossoms set and then saved to use as an accent near the sentiment.
That’s an easy trick to remember whenever you’re working with specialty papers. If most of a layer will be hidden, see whether you can die cut something useful from the center first.
Creating the Luxe Foliage Panel
To really make the Luxe Foliage paper stand out, I layered it over Secret Sea cardstock and Gold Foil, leaving just a narrow border around each layer.
Each layer is only about 1/8 inch smaller, so you’re getting just a peek of the colors underneath. That small amount of gold is enough to connect the panel beautifully to the gold design in the paper.
I placed the finished panel toward the right side of the card, which is actually a little different for me. Sometimes simply changing where you normally place your focal point can give you an entirely different-looking card design.
Finishing the Card
For the greeting, I used “Wishing you good things” from the Banner Sayings stamp set, stamped in Secret Sea and layered with Secret Sea cardstock and Gold Foil.
Because the sentiment overlaps areas of different thicknesses, I used a dimensional on one side and regular adhesive on the other. That allows the greeting to sit level rather than becoming overly raised.
Finally, I added the little Gold Foil leaf and three Gold Adhesive-Backed Dots arranged in a visual triangle. It’s a simple design trick that helps move your eye around the card and gives those final embellishments a reason for being where they are.
Watch the Full Luxe Foliage Card Tutorial
Want to see exactly how all these layers come together?
Watch my full Weekly Quick Class video below and craft along with me. I walk through the card from beginning to end and share the little tips I use along the way.
And if you’re local to Basking Ridge, New Jersey, this is one of the cards I’ll be featuring in my upcoming Stamp-a-Stack class.
For info about my upcoming in-person and virtual classes beyond my Ultimate Christmas Card Class , check out my class descriptions here and my calendar here. I hope to see you at a class sometime soon, but you can always find ideas here on my blog as well as on Facebook and Instagram. Subscribe to my weekly newsletter at the bottom of this page so you don’t miss a thing!
Luxe Foliage Card Measurements:
- Secret Sea Card Base—5 1/2” x 8 ½”, scored at 4 ¼”
- Secret Sea– 4” x 5 ¼”, 4 1/8” x 1 3/8”, ¾” x 1 5/8”
- White Willow – 4” x 5 ¼”, 5/8”x 1 ½”
- Gold Foil – 4 ¼” x 1 ½”, 7/8” x 1 ¾”, 1” x 1”
- Luxe Foliage DSP – 4” x 1 ¼”
- Gold Adhesive Backed Dots – 3
Luxe Foliage Card Supplies:
![Banner Sayings Photopolymer Stamp Set (English) [ 167044 ]](https://assets1.tamsnetwork.com/images/EC042017NF/167044s.jpg "Banner Sayings Photopolymer Stamp Set (English) [ 167044 ]")
![Luxe Foliage 12" X 12" (30.5 X 30.5 Cm) Specialty Designer Series Paper [ 168599 ]](https://assets1.tamsnetwork.com/images/EC042017NF/168599s.jpg "Luxe Foliage 12\" X 12\" (30.5 X 30.5 Cm) Specialty Designer Series Paper [ 168599 ]")
![Boutique Blossoms Dies [ 167653 ]](https://assets1.tamsnetwork.com/images/EC042017NF/167653s.jpg "Boutique Blossoms Dies [ 167653 ]")
![Gold Foil Sheets [ 132622 ]](https://assets1.tamsnetwork.com/images/EC042017NF/132622s.jpg "Gold Foil Sheets [ 132622 ]")
![Sunflower 3 D Embossing Folder [ 166145 ]](https://assets1.tamsnetwork.com/images/EC042017NF/166145s.jpg "Sunflower 3 D Embossing Folder [ 166145 ]")
![Secret Sea 8 1/2" X 11" Cardstock [ 165624 ]](https://assets1.tamsnetwork.com/images/EC042017NF/165624s.jpg "Secret Sea 8 1/2\" X 11\" Cardstock [ 165624 ]")
![White Willow 12" X 12" (30.5 X 30.5 Cm) Cardstock [ 166703 ]](https://assets1.tamsnetwork.com/images/EC042017NF/166703s.jpg "White Willow 12\" X 12\" (30.5 X 30.5 Cm) Cardstock [ 166703 ]")
![Secret Sea Classic Stampin' Pad [ 165285 ]](https://assets1.tamsnetwork.com/images/EC042017NF/165285s.jpg "Secret Sea Classic Stampin' Pad [ 165285 ]")
![Gold Adhesive Backed Dots [ 168467 ]](https://assets1.tamsnetwork.com/images/EC042017NF/168467s.jpg "Gold Adhesive Backed Dots [ 168467 ]")
![Stampin' Cut & Emboss Machine [ 149653 ]](https://assets1.tamsnetwork.com/images/EC042017NF/149653s.jpg "Stampin' Cut & Emboss Machine [ 149653 ]")
![Bone Folder [ 102300 ]](https://assets1.tamsnetwork.com/images/EC042017NF/102300s.jpg "Bone Folder [ 102300 ]")
![Stampin' Seal [ 152813 ]](https://assets1.tamsnetwork.com/images/EC042017NF/152813s.jpg "Stampin' Seal [ 152813 ]")
![Take Your Pick [ 144107 ]](https://assets1.tamsnetwork.com/images/EC042017NF/144107s.jpg "Take Your Pick [ 144107 ]")
![Stampin' Dimensionals [ 104430 ]](https://assets1.tamsnetwork.com/images/EC042017NF/104430s.jpg "Stampin' Dimensionals [ 104430 ]")
![Multipurpose Liquid Glue [ 110755 ]](https://assets1.tamsnetwork.com/images/EC042017NF/110755s.jpg "Multipurpose Liquid Glue [ 110755 ]")
0 Comments