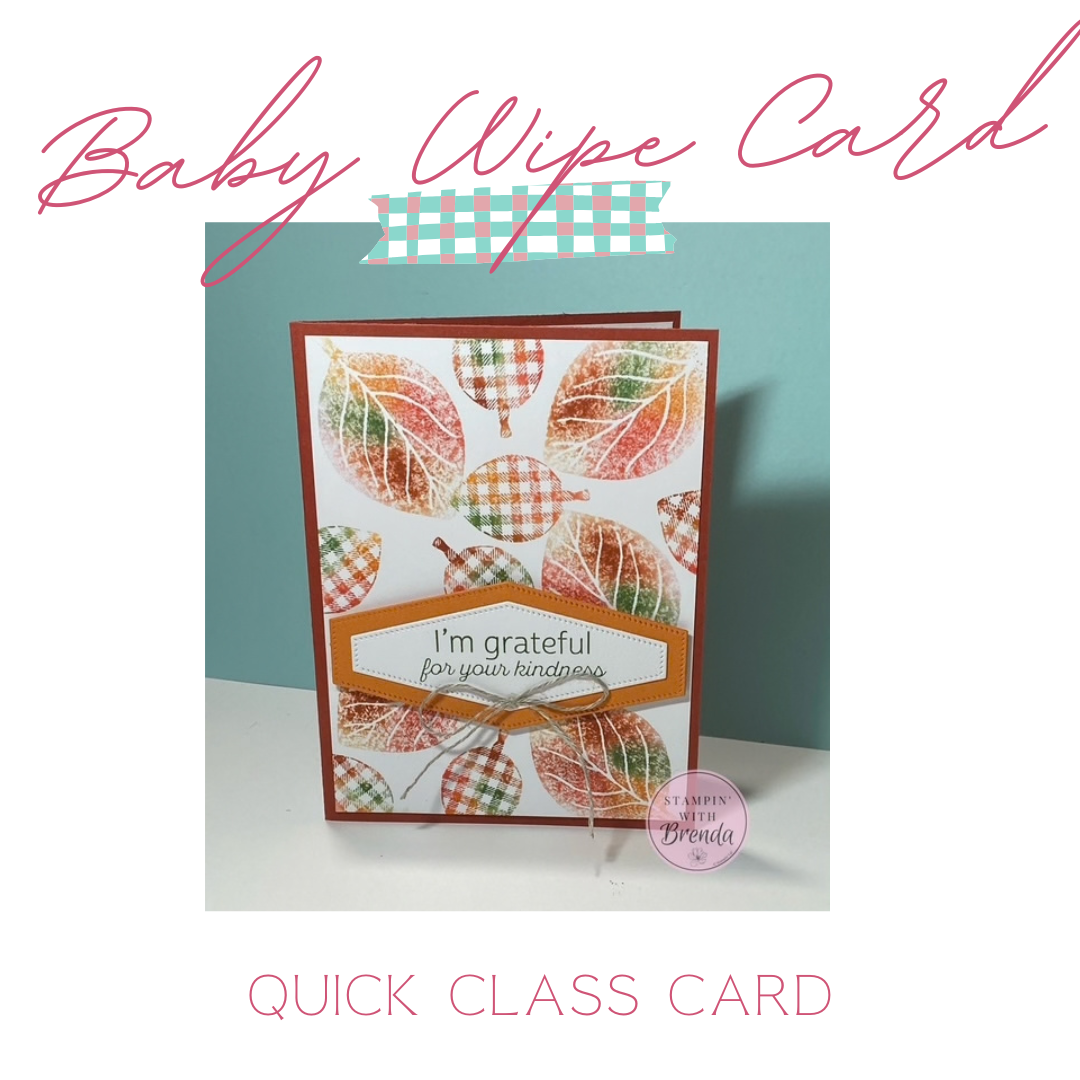
IThe baby wipe stamping technique is an easy way to create a beautiful multicolor background with a different look every time. In this week’s Quick Class, I used it with the Simply Leaves stamp set to create a colorful fall card, which is also one of the designs we’re making at my October Stamp-a-Stack classes.
The technique is easy, a little unpredictable, and perfect for autumn because several ink colors blend together on one stamp to create the look of changing leaves.
How the Baby Wipe Technique Works
Instead of using a traditional ink pad, you make your own temporary multicolor ink pad with a baby wipe.
I folded the baby wipe into a small square and placed it on a silicone mat to protect my work surface. I then added drops of reinker directly to the wipe, allowing the colors to begin spreading toward one another.
For this fall card, I used:
- Garden Green
- Poppy Parade
- Pumpkin Pie
- Cajun Craze
Cajun Craze is one of my favorite colors for autumn, and these four colors blend beautifully for fall leaves.
Creating Your Multicolor Ink Pad
Once the ink drops are on the baby wipe, use your stamp to gently begin working the colors together.
I used the larger leaf from the Simply Leaves stamp set and pressed it repeatedly into the homemade ink pad, turning the stamp only slightly between impressions. The goal isn’t to mix all of the colors into one muddy shade. You want them to begin touching while still keeping those individual fall colors visible.
Stamp a few test images on scrap paper until you’re happy with the color coverage.
One thing I discovered during the Live: one baby wipe is probably better than two. My double layer made it harder for the stamp to pick up as much ink, while the sample I had originally made with one wipe gave me richer color.
That’s one of the things I love about doing these projects live. Sometimes we learn something together!
Stamp a Fall Leaf Background
Once my homemade ink pad was ready, I stamped five of the larger leaves onto White Willow cardstock, turning the stamp in different directions so the leaves looked as though they were naturally falling across the card.
Then I switched to a smaller leaf stamp and filled in some of the open spaces, again changing the direction of the leaves as I stamped.
Because you are picking up several ink colors at once, every leaf turns out a little differently.
That variation is exactly what makes this technique so pretty.
Don’t Throw Away That Baby Wipe Yet!
Here’s a bonus idea.
When you’re finished stamping, your colorful baby wipe still has plenty of ink on it. Swipe it across a piece of cardstock and it acts almost like a rainbow ink pad, creating a completely different multicolor effect.
It’s a fun way to get another background or decorative element from supplies you would otherwise throw away.
Finishing the Fall Card
Once the stamped background was complete, I added it to a Cajun Craze card base.
For the sentiment, I used Garden Green ink and the greeting:
“I’m grateful for your kindness.”
The sentiment was die cut with the Nested Essentials Dies and layered onto Pumpkin Pie Two-Tone Cardstock for a little extra contrast.
A simple Linen Thread bow adds texture without taking attention away from those beautiful multicolored leaves.
And because sometimes a card needs just one more thing, I stamped and punched an additional leaf and popped it up with a dimensional for even more depth.
Try the Baby Wipe Technique With Different Colors
One of the best things about this technique is how easy it is to change the look.
Try:
- reds, oranges, and yellows for autumn
- blues and purples for winter
- pinks and purples for flowers
- several shades of green for foliage
- bright rainbow colors for birthdays
Just remember that colors placed next to one another will eventually blend, so choose shades that will look good together.
And don’t expect every stamped image to look exactly the same. That’s part of the fun.
Make This Card at October Stamp-a-Stack
This fall leaf card is one of the projects we’re making at my October Stamp-a-Stack.
At Stamp-a-Stack, you’ll make 10 cards total, 2 each of 5 different designs, with everything prepped and ready for you.
If you enjoy learning techniques like this one while creating cards alongside other stampers, I’d love to have you join me. Check out the class details here.
Watch the Baby Wipe Technique Video
Watch the full Quick Class replay to see exactly how I created the multicolor baby-wipe ink pad, stamped the leaves, and assembled the finished card.
If you give the baby wipe technique a try, I’d love to see what color combination you choose.
For info about my upcoming in-person and virtual classes beyond my Ultimate Christmas Card Class , check out my class descriptions here and my calendar here. I hope to see you at a class sometime soon, but you can always find ideas here on my blog as well as on Facebook and Instagram. Subscribe to my weekly newsletter at the bottom of this page so you don’t miss a thing!
Baby Wipe Leaves Card Measurements:
- Cajun Craze Card Base—5 1/2” x 8 ½”, scored at 4 ¼”
- White Willow – 4” x 5 ¼” (2), 1 ½” x 3 ½”
- Pumpkin Pie – 2” x 4”
- Linen Thread – 8”
Baby Wipe Leaves Card Supplies:
![Simply Leaves Bundle (English) [ 168165 ]](https://assets1.tamsnetwork.com/images/EC042017NF/168165s.jpg "Simply Leaves Bundle (English) [ 168165 ]")
![Nested Essentials Dies [ 161597 ]](https://assets1.tamsnetwork.com/images/EC042017NF/161597s.jpg "Nested Essentials Dies [ 161597 ]")
![Cajun Craze 8-1/2" X 11" Cardstock [ 119684 ]](https://assets1.tamsnetwork.com/images/EC042017NF/119684s.jpg "Cajun Craze 8-1/2\" X 11\" Cardstock [ 119684 ]")
![White Willow 12" X 12" (30.5 X 30.5 Cm) Cardstock [ 166703 ]](https://assets1.tamsnetwork.com/images/EC042017NF/166703s.jpg "White Willow 12\" X 12\" (30.5 X 30.5 Cm) Cardstock [ 166703 ]")
![Pumpkin Pie 12" X 12" (30.5 X 30.5 Cm) Two Tone Cardstock [ 166695 ]](https://assets1.tamsnetwork.com/images/EC042017NF/166695s.jpg "Pumpkin Pie 12\" X 12\" (30.5 X 30.5 Cm) Two Tone Cardstock [ 166695 ]")
![Cajun Craze Classic Stampin' Ink Refill [ 119790 ]](https://assets1.tamsnetwork.com/images/EC042017NF/119790s.jpg "Cajun Craze Classic Stampin' Ink Refill [ 119790 ]")
![Pumpkin Pie Classic Stampin’ Ink Refill [ 105229 ]](https://assets1.tamsnetwork.com/images/EC042017NF/105229s.jpg "Pumpkin Pie Classic Stampin’ Ink Refill [ 105229 ]")
![Garden Green Classic Stampin' Ink Refill [ 102059 ]](https://assets1.tamsnetwork.com/images/EC042017NF/102059s.jpg "Garden Green Classic Stampin' Ink Refill [ 102059 ]")
![Poppy Parade Classic Stampin’ Ink Refill [ 119791 ]](https://assets1.tamsnetwork.com/images/EC042017NF/119791s.jpg "Poppy Parade Classic Stampin’ Ink Refill [ 119791 ]")
![Garden Green Classic Stampin' Pad [ 147089 ]](https://assets1.tamsnetwork.com/images/EC042017NF/147089s.jpg "Garden Green Classic Stampin' Pad [ 147089 ]")
![Linen Thread [ 104199 ]](https://assets1.tamsnetwork.com/images/EC042017NF/104199s.jpg "Linen Thread [ 104199 ]")
![Bone Folder [ 102300 ]](https://assets1.tamsnetwork.com/images/EC042017NF/102300s.jpg "Bone Folder [ 102300 ]")
![Stampin' Seal [ 152813 ]](https://assets1.tamsnetwork.com/images/EC042017NF/152813s.jpg "Stampin' Seal [ 152813 ]")
![Stampin' Dimensionals [ 104430 ]](https://assets1.tamsnetwork.com/images/EC042017NF/104430s.jpg "Stampin' Dimensionals [ 104430 ]")
![Mini Glue Dots [ 103683 ]](https://assets1.tamsnetwork.com/images/EC042017NF/103683s.jpg "Mini Glue Dots [ 103683 ]")
0 Comments