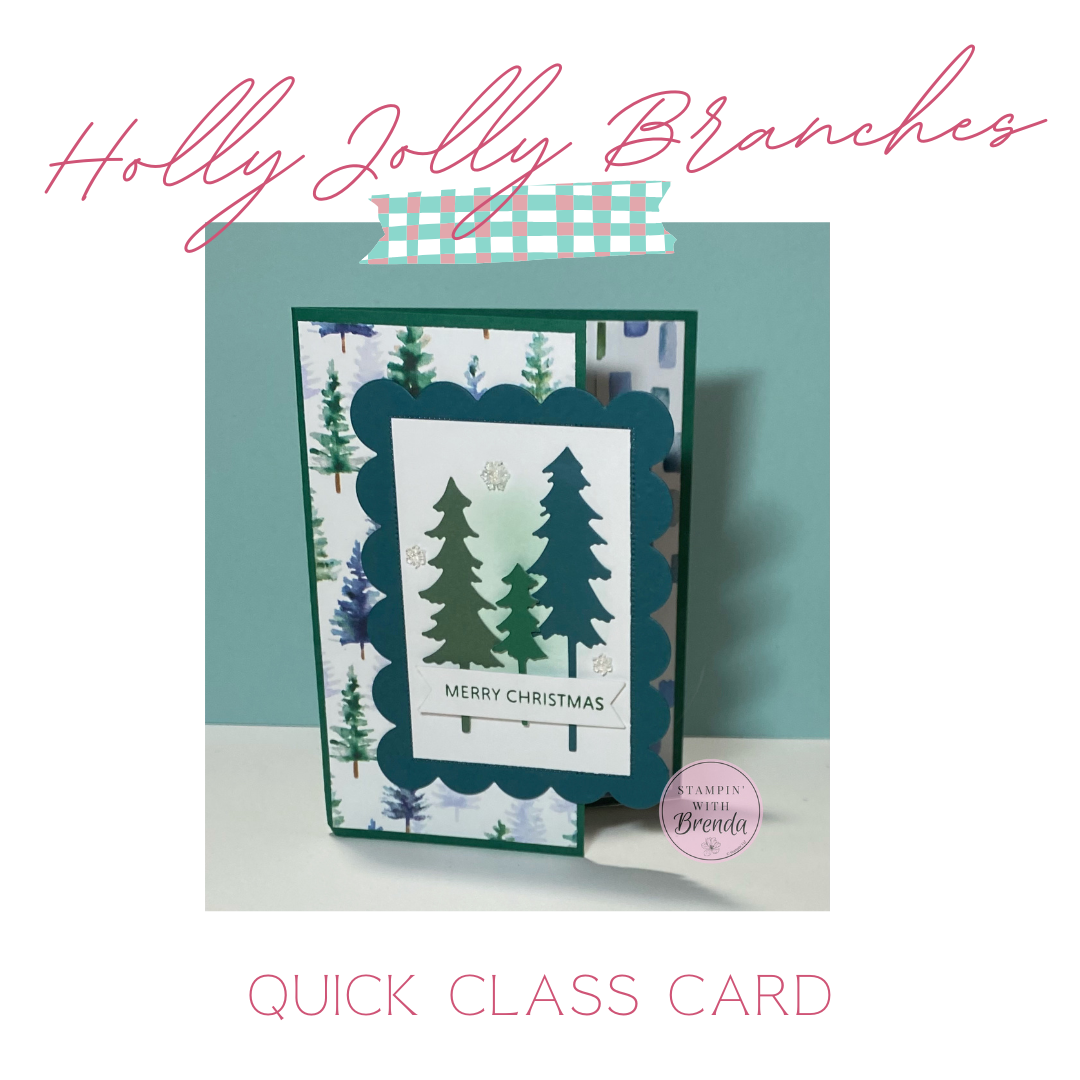
The Scalloped Christmas Cheer Bundle takes center stage in this week’s Quick Class, and I love how it transforms a simple Christmas card into something a little different! We’re combining the beautiful Whispering Woods Designer Series Paper, layered die-cut Christmas trees, a little ink blending, and a fun card-front design that lets the patterned paper peek through.
This card is also one of the projects featured in my October Cards & Company To Go Zoom Class, so you’ll get a sneak peek at what we’ll be making together.
Watch the Scalloped Christmas Cheer Card Tutorial
Watch the replay above to see the complete card come together. I’ll share tips for using Blending Brushes, layering die cuts, getting the most from Two-Tone Cardstock, and keeping your punches from jamming.
A Christmas Card with a Different Kind of Front
One of the things that makes this card interesting is its unusual card front.
Instead of using a traditional full-width front panel, I started with Pretty Peacock cardstock measuring 5-1/2″ x 8-1/2″ and cut one inch off the front edge.
That leaves a shorter card front and creates an opportunity to show off some beautiful Designer Series Paper on the inside.
I added a piece of White Willow cardstock inside the card, then layered on a strip of Whispering Woods Designer Series Paper.
When the card is closed, the patterned paper is visible along the edge. Open it up, and you get an even better look at those gorgeous colors!
It’s a simple adjustment to a standard card base, but it gives the finished card a completely different look.
Whispering Woods Designer Series Paper
You’ve seen me use the Whispering Woods Designer Series Paper in several projects recently, and I’m still finding new ways to use it.
For this card, I chose one of the patterns with beautiful blended shades of blue and green. It has an almost watercolor appearance, and I love the way the colors flow together.
The paper coordinates beautifully with Pretty Peacock, making it a natural choice for this Christmas card.
There’s another reason to love this particular paper. Stampin’ Up! donates $3 from each package sold to charitable organizations in its different markets.
It’s always nice when something we enjoy using in our craft rooms can help make a difference, too.
The Scalloped Christmas Cheer Bundle
Now for one of my favorite new bundles!
The Scalloped Christmas Cheer Bundle includes some wonderful holiday greetings, holly images, and a set of four nesting scalloped dies.
Those dies are what really caught my attention.
I love having versatile nesting dies in my collection because they can be used for so many different projects, not just Christmas cards.
For this card, I used the second-largest scalloped die to cut a Pretty Peacock panel.
I positioned it in the center of the shortened card front so that part of the scalloped shape extends over the opening.
An Important Adhesive Tip
Because part of the scalloped panel extends beyond the card front, you need to be careful where you put your adhesive.
Only apply adhesive to the portion that will actually sit on the card front.
If you add adhesive behind the overhanging section, you could accidentally glue your card shut!
Once the scalloped panel was attached, I added a piece of White Willow cardstock measuring 3-1/2″ x 2-3/8″.
This fits neatly inside the stitched border of the die-cut panel, leaving that pretty stitching visible around the outside.
Add a Soft Background with a Blending Brush
Before adding the Christmas trees, I wanted to give the white panel a little color.
I used a Blending Brush and Pretty Peacock ink to create a soft blue-green background behind the trees.
Here’s an important tip when using Blending Brushes:
Don’t take your brush directly from the ink pad to your cardstock!
Instead, tap your brush onto the ink pad to pick up some color, then gently remove some of that ink on a piece of scratch paper.
Once the strongest concentration of ink is off the brush, you can begin blending onto your cardstock.
This helps prevent those dark, uneven spots that can happen when you first touch an ink-loaded brush to the paper.
For this card, I concentrated the color toward the center of the white panel, creating a soft background for our trees.
I also mentioned during the Live that I keep separate Blending Brushes for different color families. Even when the bristles look dark from previous use, a clean, dry brush can often be reused within the same color family without transferring unwanted color.
Create Christmas Trees with Two-Tone Cardstock
For the trees, I reached for another favorite: the Holly Jolly Branches Dies.
These dies include three different sizes of evergreen trees, and I’ve been using them quite a bit this Christmas season.
I cut several trees from Pretty Peacock and Shaded Spruce Two-Tone Cardstock.
One of the things I love about Two-Tone Cardstock is that each sheet gives you two shades of the same color.
That means you can create additional interest simply by flipping a die cut over!
For this card, I experimented with different combinations of light and dark trees before settling on my arrangement.
I used a medium Shaded Spruce tree, a larger Pretty Peacock tree, and a smaller tree with its lighter side showing.
The two larger trees were adhered directly to the card, while the smallest tree was raised with a Mini Stampin’ Dimensional.
That little bit of dimension helps the trees stand apart from one another without making the card bulky.
And because the colors coordinate with the Whispering Woods paper, everything works together beautifully.
A Helpful Tip for Using Your Banner Punch
Next, I needed a banner for my Christmas greeting.
I used the Three Banner Punch, and I shared a tip that comes from experience.
When you’re punching a small shape, it can be tempting to use the tiniest scrap of cardstock possible.
But I’ve discovered that placing a piece of cardstock too close to the edges of the punch can sometimes cause the mechanism to jam.
In fact, I’ve had to replace a punch because of this!
My suggestion is to use a strip of cardstock large enough for the punch to cut cleanly around the shape.
I often have 1-1/2″ strips left over from cutting 12″ x 12″ cardstock, and these work perfectly for punching labels and banners.
Sometimes trying to save that last tiny bit of paper just isn’t worth the trouble.
A Simple Merry Christmas Greeting
For the sentiment, I used the Soiree Salutations stamp set.
This is such a useful set because it includes greetings for several occasions throughout the year, including the upcoming holidays.
I chose the simple Merry Christmas sentiment and stamped it in Pretty Peacock ink onto the white banner.
The greeting fits nicely on the scalloped panel without covering too much of the trees.
I added a couple of Stampin’ Dimensionals behind the banner to give it a little lift.
Finish with Sparkling Snowflakes
Of course, we need a little sparkle!
I finished the card with three Adhesive-Backed Snowflakes.
These come in Secret Sea and clear sparkling designs, with different sizes to choose from.
For this card, I selected one larger snowflake and two smaller ones.
I arranged them in a visual triangle, which is one of my favorite ways to position embellishments.
The snowflakes add just enough shine to give the card a festive finishing touch without competing with the Christmas trees.
Make This Card at October Cards & Company To Go
If you like this card, you can make it along with me in my upcoming October Cards & Company To Go Zoom Class!
We’ll meet on Tuesday, October 27 at 7:00 PM Eastern.
As usual, we’ll create six cards total, two each of three different designs.
Your class includes pre-cut card kits, a PDF tutorial, and access to the recorded class video.
And you don’t have to attend the Zoom session live! You can use the recording and tutorials to make your cards whenever it’s convenient for you.
Registration closes October 15, so be sure to sign up before the deadline if you’d like to join us.
Try This Christmas Card Layout with Other Papers
One of my favorite things about this project is how easily you could change the look.
The shortened card front and scalloped focal panel would work for so many different occasions.
Imagine using floral Designer Series Paper for a birthday card, pretty spring colors for Easter, or another Christmas paper with a completely different color palette.
You could even substitute a different shape if you don’t have the Scalloped Christmas Cheer Dies.
The important part is the layout itself: a shortened card front with a decorative panel that extends over the edge and allows the inside paper to show.
It’s a fun way to make a card feel a little more special without adding a lot of complicated steps.
Be sure to watch the replay above to see how everything comes together, and don’t forget to check out my October Cards & Company To Go class if you’d like to make this card with me.
For info about my upcoming in-person and virtual classes beyond my Ultimate Christmas Card Class , check out my class descriptions here and my calendar here. I hope to see you at a class sometime soon, but you can always find ideas here on my blog as well as on Facebook and Instagram. Subscribe to my weekly newsletter at the bottom of this page so you don’t miss a thing!
Scalloped Christmas Card Measurements:
- Pretty Peacock Card Base—5 1/2” x 7 ½”, scored at 4 ¼”
- White Willow – 4” x 5 ¼”, 2 3/8” x 3 ½”, scrap
- Pretty Peacock – 4” x 5”
- Shaded Spruce Two-Toned – 1″ x 3″ (2)
- Pretty Peacock Two-Toned – 1″ x 3″
- Whispering Woods DSP – 5 ¼” x 3”, 1” x 5 ¼”
Scalloped Christmas Card Supplies:
![Holly Jolly Branches Bundle (English) [ 168280 ]](https://assets1.tamsnetwork.com/images/EC042017NF/168280s.jpg "Holly Jolly Branches Bundle (English) [ 168280 ]")
![Soiree Salutations Photopolymer Stamp Set (English) [ 168337 ]](https://assets1.tamsnetwork.com/images/EC042017NF/168337s.jpg "Soiree Salutations Photopolymer Stamp Set (English) [ 168337 ]")
![Scalloped Christmas Cheer Bundle (English) [ 168545 ]](https://assets1.tamsnetwork.com/images/EC042017NF/168545s.jpg "Scalloped Christmas Cheer Bundle (English) [ 168545 ]")
![Pretty Peacock 8-1/2" X 11" Cardstock [ 150880 ]](https://assets1.tamsnetwork.com/images/EC042017NF/150880s.jpg "Pretty Peacock 8-1/2\" X 11\" Cardstock [ 150880 ]")
![White Willow 12" X 12" (30.5 X 30.5 Cm) Cardstock [ 166703 ]](https://assets1.tamsnetwork.com/images/EC042017NF/166703s.jpg "White Willow 12\" X 12\" (30.5 X 30.5 Cm) Cardstock [ 166703 ]")
![Whispering Woods 12" X 12" (30.5 X 30.5 Cm) Designer Series Paper [ 168368 ]](https://assets1.tamsnetwork.com/images/EC042017NF/168368s.jpg "Whispering Woods 12\" X 12\" (30.5 X 30.5 Cm) Designer Series Paper [ 168368 ]")
![Pretty Peacock 12" X 12" (30.5 X 30.5 Cm) Two Tone Cardstock [ 166694 ]](https://assets1.tamsnetwork.com/images/EC042017NF/166694s.jpg "Pretty Peacock 12\" X 12\" (30.5 X 30.5 Cm) Two Tone Cardstock [ 166694 ]")
![Shaded Spruce 12" X 12" (30.5 X 30.5 Cm) Two Tone Cardstock [ 166697 ]](https://assets1.tamsnetwork.com/images/EC042017NF/166697s.jpg "Shaded Spruce 12\" X 12\" (30.5 X 30.5 Cm) Two Tone Cardstock [ 166697 ]")
![Adhesive Backed Snowflakes [ 168316 ]](https://assets1.tamsnetwork.com/images/EC042017NF/168316s.jpg "Adhesive Backed Snowflakes [ 168316 ]")
![Bone Folder [ 102300 ]](https://assets1.tamsnetwork.com/images/EC042017NF/102300s.jpg "Bone Folder [ 102300 ]")
![Stampin' Seal [ 152813 ]](https://assets1.tamsnetwork.com/images/EC042017NF/152813s.jpg "Stampin' Seal [ 152813 ]")
![Take Your Pick [ 144107 ]](https://assets1.tamsnetwork.com/images/EC042017NF/144107s.jpg "Take Your Pick [ 144107 ]")
![Stampin' Dimensionals [ 104430 ]](https://assets1.tamsnetwork.com/images/EC042017NF/104430s.jpg "Stampin' Dimensionals [ 104430 ]")
![Silicone Craft Sheet [ 127853 ]](https://assets1.tamsnetwork.com/images/EC042017NF/127853s.jpg "Silicone Craft Sheet [ 127853 ]")
0 Comments