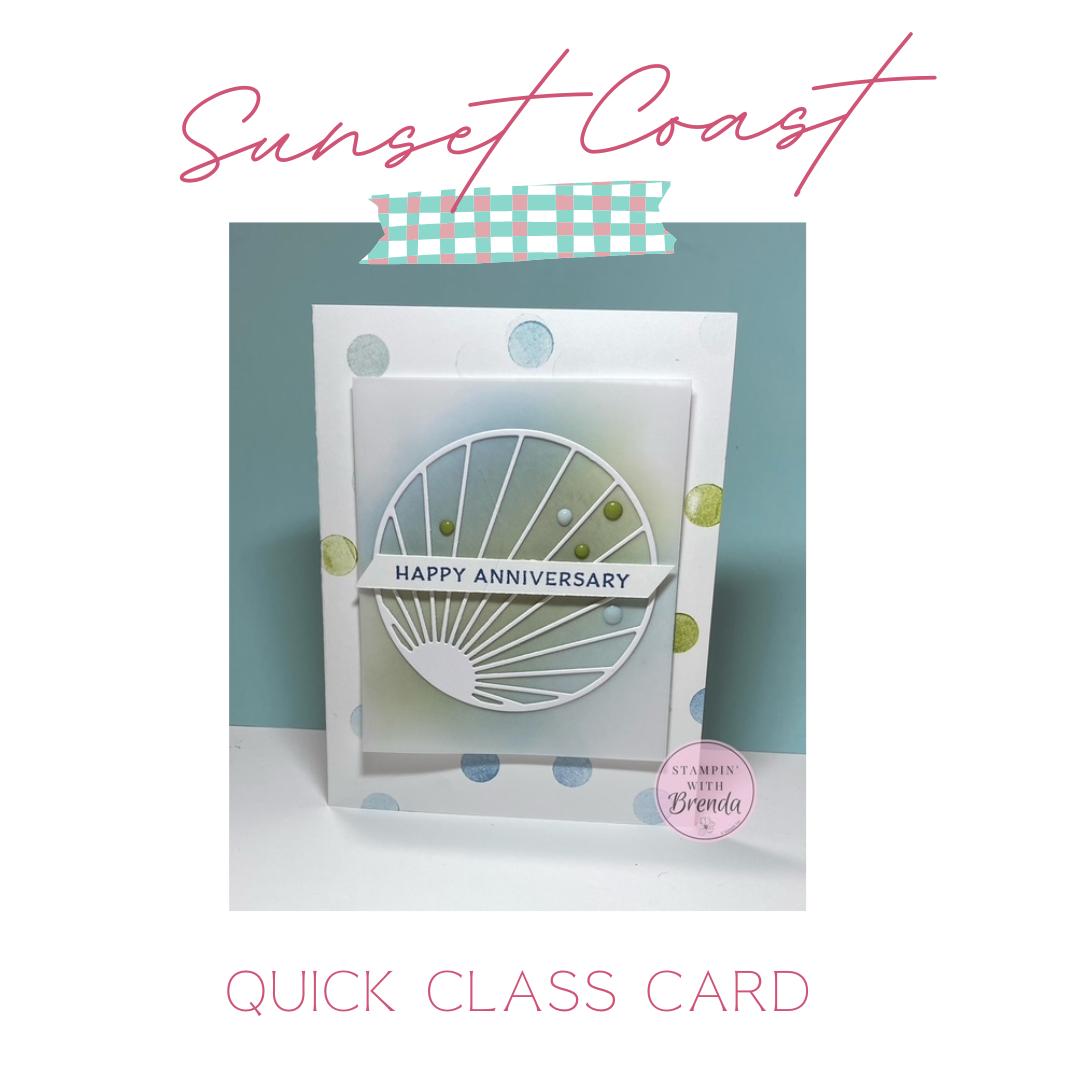
The Sunset Coast Bundle takes a different direction in this week’s Quick Class! Although I’ve used this Stampin’ Up! bundle for several beach-inspired projects, this time I’m showing how versatile it can be with a Happy Anniversary card featuring a custom stamped background, blending brushes, vellum, and a few clever techniques you can use on all kinds of handmade cards.
This card is one of the projects we’re making at my August Stamp-a-Stack, and the design was inspired by an alternate project shared in Stampin’ Up!’s Sunset Coast class. I loved the techniques they used and decided it was time to bring a few of them back into my classes.
Watch the Sunset Coast Card Tutorial
In the video replay, I’ll take you through the entire card from beginning to end, including a few tips for getting the best results with your blending brushes and hiding adhesive behind vellum.
Start by Creating Your Own Stamped Background
Instead of reaching for Designer Series Paper, we’re making our own patterned paper background for this card.
I started with a standard Thick White card base and used a round image from the Sunset Coast stamp set. The image was designed to be used as a sun, but when it’s stamped repeatedly, it makes a great polka-dot background.
That’s one of my favorite things about stamping: a stamp doesn’t have to be used only for its intended purpose!
I used Misty Moonlight and Old Olive ink, stamping off before adding the images to the card. I even stamped some of the images a second time without reinking to create variations in color.
And here’s the fun part: I stamped the pattern across the entire card base, front and back.
There’s no need to make the dots perfectly spaced. In fact, a random arrangement is part of the charm. Be sure to stamp some images off the edges and across the fold so the design feels continuous.
Blending Brushes Create the Focal Background
Next, I used a piece of White Willow cardstock measuring 3 3/8″ x 4″ and brought out the Misty Moonlight and Old Olive inks again.
This time, instead of stamping, we’re using Blending Brushes.
I blended Old Olive through the center of the cardstock and Misty Moonlight toward the top and bottom. The colors don’t need to be perfectly blended because another layer is coming that completely changes the look.
One blending brush tip I shared in the video is to hold the brush closer to the head instead of at the end of the handle. I find that this gives me much better control over the pressure I’m applying.
Add Movement with the Sunset Coast Die
Here’s where the card really starts getting interesting.
I die cut the large ray design from the Sunset Coast Bundle and positioned it diagonally across the blended panel. The diagonal placement creates a wonderful sense of movement across the card.
The rays could suggest sunshine, but the design is abstract enough that it can work in lots of different ways. That’s one reason I like finding unexpected uses for dies like this.
Vellum Makes the Magic Happen
When the blended panel is first placed onto the card, the colors look fairly strong.
Then comes the vellum.
I placed a piece of vellum the same size as the blended cardstock over the entire panel, and it instantly softened the Misty Moonlight and Old Olive underneath.
This is such an easy technique, but the difference is dramatic. Vellum can tone down bold colors without completely hiding them and gives the card a soft, almost frosted appearance.
It’s also a great trick to remember when a background you’ve created feels just a little too intense.
How to Hide Adhesive Behind Vellum
Of course, vellum comes with one little challenge: you can see adhesive through it.
Instead of putting adhesive around the edges and hoping for the best, I first attached the die-cut rays and sentiment to the front of the vellum.
Then I turned the vellum over.
Now I could see exactly where those elements were located and place my adhesive behind them, where it wouldn’t show through.
For the more delicate areas, I used small amounts of liquid adhesive and spread the glue very thinly with the tip of the applicator.
This is a simple vellum trick that you can use over and over again on your cardmaking projects.
A Simple Happy Anniversary Sentiment
I especially like that the Sunset Coast stamp set includes a Happy Anniversary greeting. Anniversary sentiments aren’t always easy to find, so it’s nice to have one tucked into such a versatile set.
I stamped the sentiment in Misty Moonlight on a narrow 3/8″ strip of White Willow cardstock, then trimmed both ends at an angle.
The sentiment is popped up with Mini Stampin’ Dimensionals and positioned across the lower portion of the die-cut rays.
The simple sentiment treatment keeps the focus on all the texture and color happening behind it.
Finish with Moody Palette Glossy Dots
The final touch is the Moody Palette Glossy Dots.
Normally, I’m a three-embellishment kind of girl, but this card called for more! I used five glossy dots in coordinating shades and mixed the different sizes across the card front.
They add just enough shine and help carry the Misty Moonlight, Old Olive, and Cloud Cover colors throughout the design.
Try These Techniques on Your Next Card
Although this card features the Sunset Coast Bundle, the techniques are really the stars of this project.
We used:
- Repeated stamping to create our own patterned background
- Stamping off to create different intensities of the same ink color
- Blending Brushes to create a graduated background
- A die cut positioned diagonally to create movement
- Vellum to soften bold colors
- Strategically placed adhesive to keep it hidden behind vellum
- Dimensionals and glossy dots to add depth and texture
Those are techniques you can easily take from this project and use with stamps, dies, and colors you already own.
If you’re attending my Stamp-a-Stack this week, consider this your sneak peek and mini tutorial before class! And if you can’t join us in person, you can still make the card right along with me by watching the replay above.
For info about my upcoming in-person and virtual classes, check out my class descriptions here and my calendar here. I hope to see you at a class sometime soon, but you can always find ideas here on my blog as well as on Facebook and Instagram. Subscribe to my weekly newsletter at the bottom of this page so you don’t miss a thing!
Sunset Coast Anniversary Card Measurements:
- Thick Card Base—5 1/2” x 8 ½”, scored at 4 ¼”
- White Willow –3 3/8” x 4”, 3/8” x 3 ¾”
- Vellum – 3 3/8” x 4”
- Moody Palette Glossy Dots – 5
Sunset Coast Anniversary Card Supplies:
![Sunset Coast Bundle (English) [ 167781 ]](https://assets1.tamsnetwork.com/images/EC042017NF/167781s.jpg "Sunset Coast Bundle (English) [ 167781 ]")
![Basic White 8 1/2" X 11" Thick Cardstock [ 159229 ]](https://assets1.tamsnetwork.com/images/EC042017NF/159229s.jpg "Basic White 8 1/2\" X 11\" Thick Cardstock [ 159229 ]")
![White Willow 12" X 12" (30.5 X 30.5 Cm) Cardstock [ 166703 ]](https://assets1.tamsnetwork.com/images/EC042017NF/166703s.jpg "White Willow 12\" X 12\" (30.5 X 30.5 Cm) Cardstock [ 166703 ]")
![Vellum 12" X 12" (30.5 X 30.5 Cm) Specialty Paper [ 167099 ]](https://assets1.tamsnetwork.com/images/EC042017NF/167099s.jpg "Vellum 12\" X 12\" (30.5 X 30.5 Cm) Specialty Paper [ 167099 ]")
![Old Olive Classic Stampin' Pad [ 147090 ]](https://assets1.tamsnetwork.com/images/EC042017NF/147090s.jpg "Old Olive Classic Stampin' Pad [ 147090 ]")
![Misty Moonlight Classic Stampin' Pad [ 153118 ]](https://assets1.tamsnetwork.com/images/EC042017NF/153118s.jpg "Misty Moonlight Classic Stampin' Pad [ 153118 ]")
![Moody Palette Glossy Dots [ 167180 ]](https://assets1.tamsnetwork.com/images/EC042017NF/167180s.jpg "Moody Palette Glossy Dots [ 167180 ]")
![Blending Brushes [ 153611 ]](https://assets1.tamsnetwork.com/images/EC042017NF/153611s.jpg "Blending Brushes [ 153611 ]")
![Stampin' Cut & Emboss Machine [ 149653 ]](https://assets1.tamsnetwork.com/images/EC042017NF/149653s.jpg "Stampin' Cut & Emboss Machine [ 149653 ]")
![Stampin' Dimensionals [ 104430 ]](https://assets1.tamsnetwork.com/images/EC042017NF/104430s.jpg "Stampin' Dimensionals [ 104430 ]")
![Bone Folder [ 102300 ]](https://assets1.tamsnetwork.com/images/EC042017NF/102300s.jpg "Bone Folder [ 102300 ]")
![Stampin' Seal [ 152813 ]](https://assets1.tamsnetwork.com/images/EC042017NF/152813s.jpg "Stampin' Seal [ 152813 ]")
![Take Your Pick [ 144107 ]](https://assets1.tamsnetwork.com/images/EC042017NF/144107s.jpg "Take Your Pick [ 144107 ]")
0 Comments