

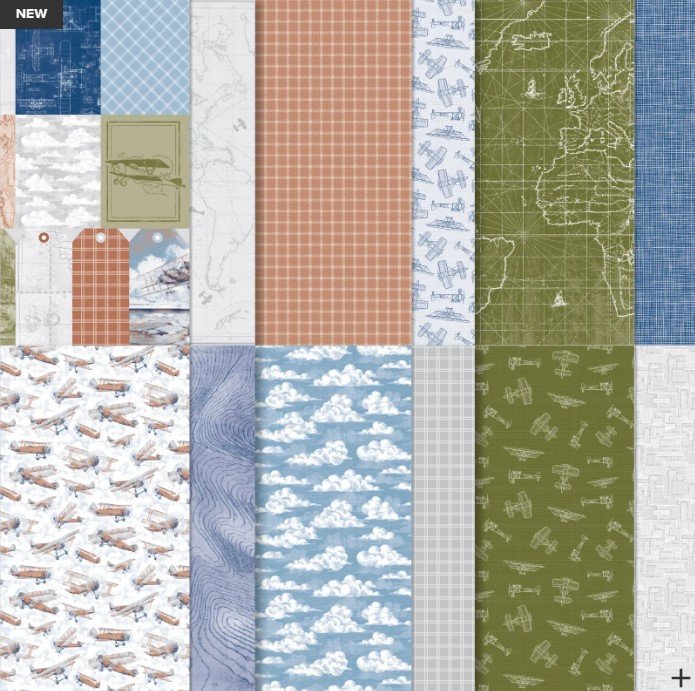
With the launch of the new catalog, we have the new Take to the Sky Designer Series Paper (DSP)! These maps, blueprints, textured clouds, and sketched planes are fitting for aviation, military, outdoor, or adventure-themed cards and crafts. Use the planes and clouds as backgrounds, or fussy cut around the topographical map lines and plane blueprints for a fun focal point. Whether you’re making cards for Father’s Day, adventure-seekers, veterans, or outdoor enthusiasts, this is great paper to have on hand!
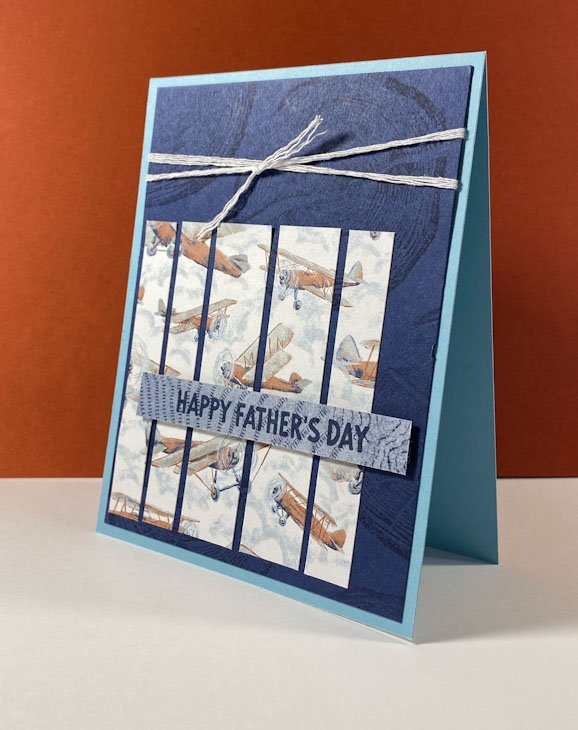
I just love the cut-paper technique on this card. By separating the DSP into thin panels and then piecing back together with tiny spaces in between each, the DSP now pops from the card and looks way more complicated than it actually is! Follow the cutting instructions below and you now have a go-to technique to fancy-up any card with a little DSP!
Below is the tutorial for the card featured above. For more ideas every month, be sure to sign up for my weekly newsletter at the bottom of this page. For info about my upcoming in-person and virtual classes, check out my class descriptions here and my calendar here. Thanks for checking this out!
Take to the Sky Card Measurements:
- Balmy Blue base – 4 ¼” x 11”, score at 5 ½”
- Night of Navy – 4” x 5 ¼”
- Basic White – 4” x 5 ¼” for inside
- Take to the Sky DSP – 3 ½” x 3 ½”
Instructions:
- Using Night of Navy ink, stamp tree ring onto Night of Navy card layer. Separate length of White Baker’s twine into three strands by unwinding it to make a slimmer ribbon. Wrap length of White Bakers twine around Navy layer, tie in knot, trim and secure to back with piece of tape. Adhere to Base layer with liquid glue.
- Trim DSP layer in various widths keeping them in order to re-adhere to card. Card shown is cut at ½”, ¾”, ¾”, ¼”, ½”, ¼”. Use last piece, flipped over for sentiment. Stamp sentiment in Night of Navy ink.
- Using liquid glue, adhere DSP to card front, it is easier if you begin by lining them up approximately where you want them. Adhere the farthest right piece, then add as many that will fit onto the card front or as desired. Add sentiment panel with Stampin’ Dimensionals.
- Adhere white panel to inside of card.
Take to the Sky Card Supplies:
")

 Designer Series Paper")


0 Comments