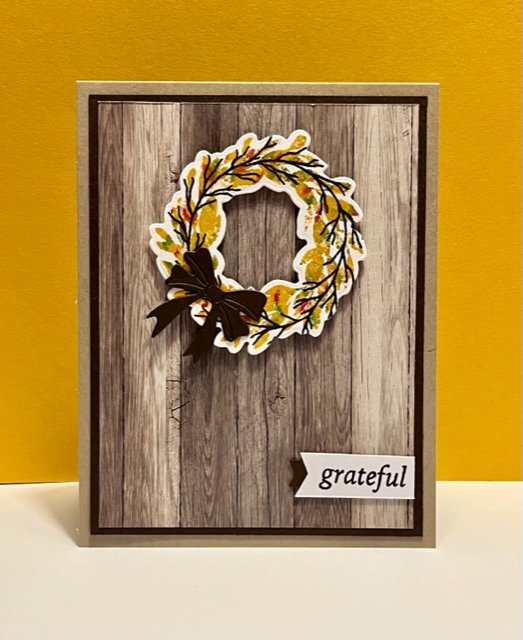
Elevate your gratitude this season with the exquisite Cottage Wreath Stamps and Dies from Stampin’ Up! Crafted with precision and elegance, these versatile tools enable you to create stunning wreath designs that convey your heartfelt appreciation. Let these captivating stamps and dies be the perfect addition to your seasonal projects, allowing you to express gratitude in a formal and sophisticated manner.
Here, I’ve used the wreath atop a woodgrain background, lending a very autumn feel. With a quick little banner with “grateful” on it, this makes a perfect card for sending your Thanksgiving greetings. Below is a tutorial with all the details.
We make cards like this in all my classes, both virtual and in-person. Check out my class calendar to see my upcoming classes, and my class page for all my class offerings.
Cottage Wreath Card Measurements:
- Crumb Cake Card Base 11” x 4-1/4”, scored at 5 ½” and folded
- Early Espresso 4 x 5 ¼”, ¼” x 1 ¾”, scrap for bow
- Designer Series Paper 3 ¾” x 5”
- Basic White scraps for stamping/die cut, ½” x 1 ½” for sentiment
Cottage Wreath Card Supplies:
Instructions:
- Stamp branch image in Early Espresso Ink on Basic White scrap
- Stamp leaf image in Crushed Curry ink, then gently tap the brush tip of the following marker colors on the leaf stamp – Pumpkin Pie, Real Red, Garden Green. Huff on stamp and then stamp over branch wreath.
- Die cut wreath with coordinating die.
- Die cut bow from scrap of Early Espresso
- Stamp sentiment in Early Espresso ink on Basic White strip. Flag cut end with Paper Snips
- Flag cut end of Early Espresso strip.
- Adhere Early Espresso strip to back of sentiment strip with Stampin’ Seal.
- Attach Early Espresso mat to card base with Stampin’ Seal.
- Attach Designer Series Paper to Early Espresso with Stampin’ Seal.
- Attach wreath to card front with Dimensionals
- Attach bow to wreath with Stampin’ Seal
- Attach sentiment to card front with Stampin’ Seal.


0 Comments