Dry Embossing Vellum is a technique often overlooked when creating cards. With Stampin’ Up!’s lovely selection of embossing folders, using this technique is truly fun and easy.
Dry embossing is a paper crafting technique used to create raised designs or patterns on paper without the use of ink or wet mediums. It involves pressing a stencil or template onto paper using a specialized tool such as an embossing stylus or embossing machine. The pressure applied during this process creates a raised relief on the paper, resulting in a tactile and visually appealing effect. Embossing folders, used with the Stampin’ Cut & Emboss machine, mimics the use of the stylus and applies even pressure across the image. It adds texture and dimension to projects, allowing for intricate and detailed designs to be brought to life.
Dry embossing on paper is an impressive technique, but using it on vellum leads to truly stunning results! The thinness of the vellum paper allows whatever is behind it to show through softly. The impression made by the embossing folder seems deeper, and the unique texture of the vellum shows off the gradiation of the folder’s design.
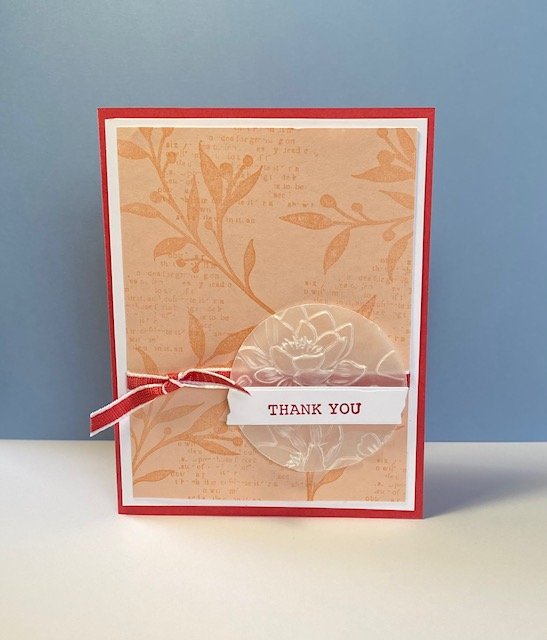
My favorite new embossing folder is the Layered Florals 3D folder found in the January-April 2024 mini catalog. The denser pattern with a variety of flower designs lends itself perfectly to embossing on vellum. I shared the use of it to make the above card in my Quick Class on 3/13/24 along with a few tips. The tutorial can be found below. I hope you’ll give embossing on vellum a try!
For info about my upcoming in-person and virtual classes, check out my class descriptions here and my calendar here. For more ideas every month, be sure to sign up for my weekly newsletter at the bottom of this page. Thanks for checking this out!
Dry Embossing Vellum Card Measurements:
- Sweet Sorbet – 8 ½” x 5 ½”, score and fold at 4 ¼”
- Basic White – 4” x 5 ¼” (2), scrap for die cutting
- Petal Pink – 3 ¾” x 5”
- Vellum Cardstock – 3” x 3” for punching
- Sweet Sorbet ribbon – 6” and 3”
Instructions:
- Cut all paper.
- Fold Sweet Sorbet card base. Adhere one Basic White panel to inside of card and one to the card front.
- Stamp leaves and type press in Petal Pink ink on Petal Pink panel. Wrap 6” piece of ribbon around panel and adhere on the back ONLY. Add this to the card front.
- Punch vellum circle with 2 3/8” Circle Punch. Send this through the Layered Florals 3D embossing folder using the specialty plate. Add embossed circle to the right side of the card front over the ribbon using a dimensional where it will be hidden by the sentiment strip.
- Stamp sentiment using Sweet Sorbet ink on Basic White scrap. Die cut using label die from the Gorgeously Made die set. Adhere using dimensionals over the vellum circle, making sure to cover the dimensional that you can see through the vellum.
- Slide the 3” ribbon under the ribbon on card front and tie a tight knot.


0 Comments