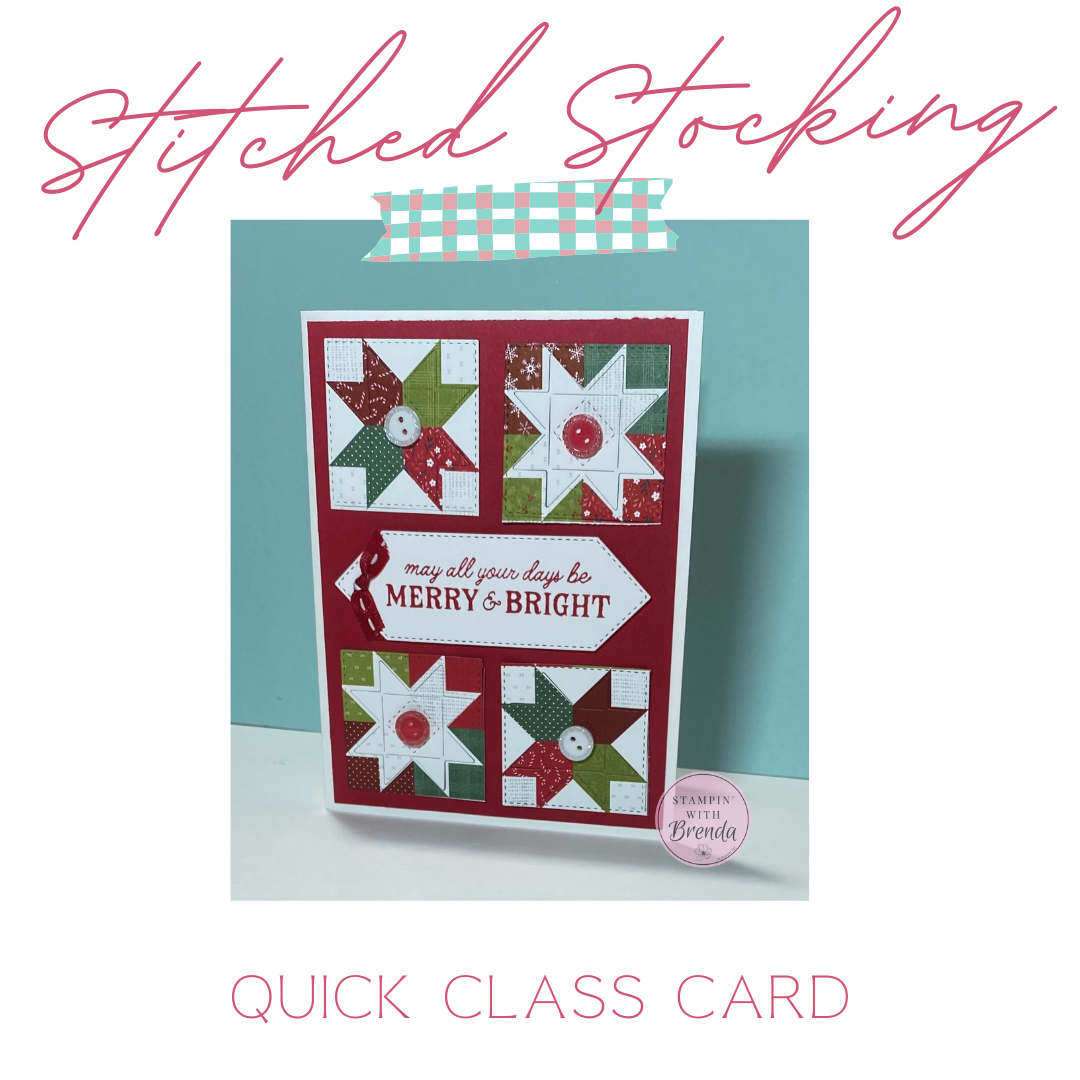
It’s never too early to start creating Christmas cards, and the release of the new Stitched Stocking bundle gave me the perfect opportunity! This week during my Wednesday Live, I shared one of the first designs I’m considering for my annual Ultimate Christmas Card Class. Every year I create 10 different card designs (two of each for a total of 20 cards), and finding fresh ideas is always one of my favorite creative challenges.
This week’s project was inspired by a beautiful card created by fellow Stampin’ Up! demonstrator Linda Schnabel, who introduced me to a technique that instantly caught my eye. I’m calling it faux quilting, and it’s a wonderful way to create the look of a quilted card without any “actual” stitching.
Watch the replay below, then keep reading to see how this technique comes together.
A Quilted Look Without Sewing
As someone who has always admired quilts (even though I’ve never made one!), I was immediately drawn to this technique.
The magic happens by combining the Stitched Stocking Bundle with the beautiful Stitched Seasons Designer Series Paper. The paper already features quilt-inspired patterns, but the coordinating dies take it one step further by adding stitched details around each square, creating the illusion of individually quilted blocks.
The result is a Christmas card with incredible texture and visual interest.
Creating the Faux Quilted Squares
The designer paper includes one sheet that’s divided into 2-inch quilt-style squares, making it perfect for this technique.
After cutting out four of the squares, I used one of the decorative dies from the Stitched Stocking bundle—not to cut a stocking, but to add stitched detail directly onto each paper square.
The die embosses and cuts stitched lines that make each square look like a miniature quilt block.
One helpful tip from the live: use a small piece of washi tape to hold the die in place before running it through your Stampin’ Cut & Emboss Machine. It helps keep everything aligned for the best results.
Building the Card Front
The card begins with a Thick Basic White card base layered with Real Red Two-Tone Cardstock.
Next, the four quilted squares are arranged in opposite corners, creating an eye-catching layout while leaving space in the center for the greeting.
The quarter-inch border around the edge keeps everything balanced and lets the quilt-inspired patterns shine.
A Simple Holiday Greeting
One of my favorite sentiments in the bundle is:
“May all your days be merry and bright.”
I stamped the greeting in Real Red onto a die-cut label from the bundle and popped it up with Stampin’ Dimensionals to give the center of the card a little extra depth.
Sometimes a clean, simple greeting is all you need when the background does most of the work.
Festive Finishing Touches
The embellishments really bring this card together.
I added the new Adhesive-Backed Mini Christmas Buttons, alternating red and white buttons to complement the quilt blocks. They add sparkle and reinforce the handmade quilt theme beautifully.
To finish the card, I tied a simple knot using the coordinating Real Red & White Stitched Ribbon and attached it with a Glue Dot.
The ribbon is wonderfully soft and easy to knot, making it a perfect finishing accent.
A Possible Addition to My Ultimate Christmas Card Class
This card is one of the first designs I’m considering for this year’s Ultimate Christmas Card Class.
Each year I create a class featuring:
- 20 handmade Christmas cards
- 10 unique designs (2 of each)
- Complete card kits
- Step-by-step video tutorials
- Printable PDF instructions
Registration will open later in August, with kits shipping in early October, so stay tuned for more details!
Give Faux Quilting a Try
If you’re looking for a unique way to use your Designer Series Paper and the Stitched Stocking bundle, this faux quilting technique is definitely worth trying.
It’s a wonderful way to add texture and interest to your cards while letting beautiful patterned paper do most of the work.
If you recreate this project, I’d love to see your version! Be sure to watch the replay above for the complete tutorial, measurements, and product list.
For info about my upcoming in-person and virtual classes, check out my class descriptions here and my calendar here. I hope to see you at a class sometime soon, but you can always find ideas here on my blog as well as on Facebook and Instagram. Subscribe to my weekly newsletter at the bottom of this page so you don’t miss a thing!
Faux Quilted Stitched Stocking Card Measurements:
- Thick Basic White Card Base—5 1/2” x 8 ½”, scored at 4 ¼”
- Real Red Two-Tone –4” x 5 ¼”
- A Stitched Season DSP – 2” x 2” (4)
- White Willow – 4” x 1 ¼”
- Real Red/White Stitched Ribbon – 4”
Faux Quilted Stitched Stocking Card Supplies:
![Stitched Stocking Bundle (English) [ 168231 ]](https://assets1.tamsnetwork.com/images/EC042017NF/168231s.jpg "Stitched Stocking Bundle (English) [ 168231 ]")
![A Stitched Season 12" X 12" (30.5 X 30.5 Cm) Designer Series Paper [ 168223 ]](https://assets1.tamsnetwork.com/images/EC042017NF/168223s.jpg "A Stitched Season 12\" X 12\" (30.5 X 30.5 Cm) Designer Series Paper [ 168223 ]")
![Basic White 8 1/2" X 11" Thick Cardstock [ 159229 ]](https://assets1.tamsnetwork.com/images/EC042017NF/159229s.jpg "Basic White 8 1/2\" X 11\" Thick Cardstock [ 159229 ]")
![White Willow 12" X 12" (30.5 X 30.5 Cm) Cardstock [ 166703 ]](https://assets1.tamsnetwork.com/images/EC042017NF/166703s.jpg "White Willow 12\" X 12\" (30.5 X 30.5 Cm) Cardstock [ 166703 ]")
![Real Red 12" X 12" (30.5 X 30.5 Cm) Two Tone Cardstock [ 166696 ]](https://assets1.tamsnetwork.com/images/EC042017NF/166696s.jpg "Real Red 12\" X 12\" (30.5 X 30.5 Cm) Two Tone Cardstock [ 166696 ]")
![Real Red 1/4" (6.4 Mm) Stitched Ribbon [ 168235 ]](https://assets1.tamsnetwork.com/images/EC042017NF/168235s.jpg "Real Red 1/4\" (6.4 Mm) Stitched Ribbon [ 168235 ]")
![Adhesive Backed Mini Christmas Buttons [ 168234 ]](https://assets1.tamsnetwork.com/images/EC042017NF/168234s.jpg "Adhesive Backed Mini Christmas Buttons [ 168234 ]")
![Stampin' Cut & Emboss Machine [ 149653 ]](https://assets1.tamsnetwork.com/images/EC042017NF/149653s.jpg "Stampin' Cut & Emboss Machine [ 149653 ]")
![Stampin' Seal [ 152813 ]](https://assets1.tamsnetwork.com/images/EC042017NF/152813s.jpg "Stampin' Seal [ 152813 ]")
![Bone Folder [ 102300 ]](https://assets1.tamsnetwork.com/images/EC042017NF/102300s.jpg "Bone Folder [ 102300 ]")
![Stampin' Dimensionals [ 104430 ]](https://assets1.tamsnetwork.com/images/EC042017NF/104430s.jpg "Stampin' Dimensionals [ 104430 ]")
![Mini Glue Dots [ 103683 ]](https://assets1.tamsnetwork.com/images/EC042017NF/103683s.jpg "Mini Glue Dots [ 103683 ]")
0 Comments