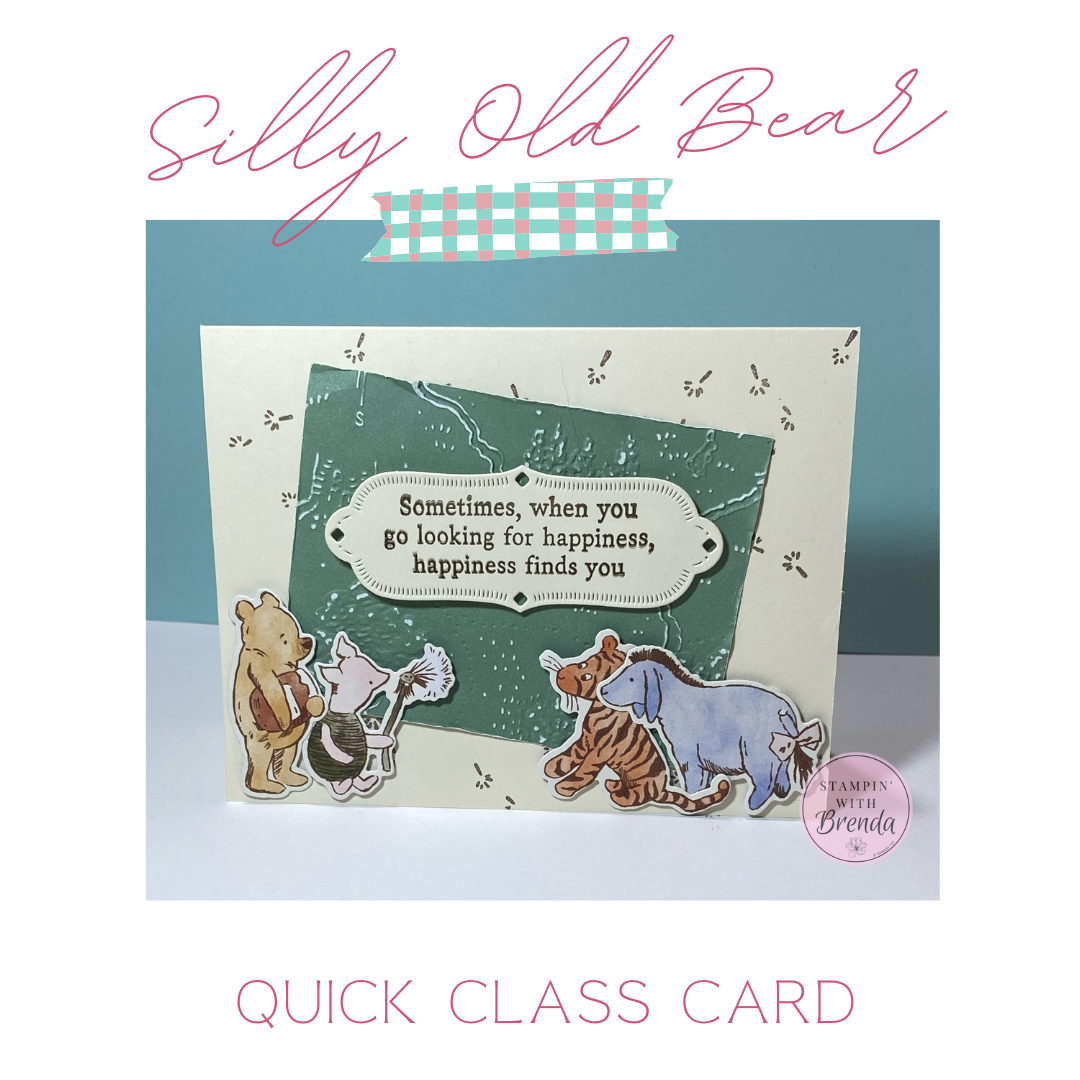
This week’s live started with me trying to work on my June classes… and then I got completely distracted by an adorable swap card featuring the new Silly Old Bear Suite. Honestly, once I started cutting characters out of the designer series paper, there was no turning back.
The result? A sweet handmade card inspired by a swap from Hannah Byrd that combines embossed texture, distressed paper techniques, and the cutest Pooh and friends images. If you love scene cards, storytelling through paper crafting, or creative ways to use designer series paper, this project is so much fun.
Watch the replay:
The inspiration for today’s card came from the new Silly Old Bear Designer Series Paper and coordinating products. One of the things I love most about this suite is how versatile it is.
The paper includes:
- Scenic 100 Acre Woods backgrounds
- Character patterns featuring Pooh, Piglet, Tigger, Eeyore, Rabbit, and more
- Sheets designed specifically for die cutting
- Coordinating patterns on the reverse sides
One of the standout features is that several images can be cut directly from the paper using the coordinating dies. That made it incredibly easy to build a layered card scene without any coloring.
How This Card Came Together
The original swap card was created by Hannah Byrd, and after preparing to post her card on social media, I started wondering what it would look like using the die-cut characters from the paper itself.
That led me down a very happy crafting rabbit hole.
I cut a full collection of characters from a single 6×6 piece of designer series paper and started arranging them into a little story scene centered around Piglet blowing dandelion seeds across the card.
The layout naturally guided the direction each character faced, which turned out to be one of the most fun parts of designing the card.
To add texture and dimension, I used the new 100 Acre Woods Embossing Folder with the new two-tone cardstock in Peaceful Pine.
After embossing, I used a sanding block to lightly distress the raised areas of the cardstock. Because the two-tone cardstock has a white core, sanding reveals the lighter layer underneath and makes the embossed design really stand out.
I also roughed up the edges and added a bit of crumpling for a soft vintage feel that worked perfectly with the woodland theme.
One important tip from the live:
- Use a liquid adhesive when attaching heavily textured or embossed pieces so they stick securely to your card base.
Building the Scene
Once the background was complete, it was time for the characters.
I used dimensionals to layer:
- Piglet as the focal point
- Pooh standing nearby watching
- Tigger and Eeyore facing inward from the opposite side
- Rabbit peeking in from the edge
The movement of the dandelion seeds stamped in the background helps guide your eye across the card and ties the entire scene together.
The sentiment says:
“Sometimes when you go looking for happiness, happiness finds you.”
I paired it with one of the coordinating label dies from the Sweet Words and Labels Bundle, which includes some really beautiful label shapes that work well beyond this suite.
Coming Soon to Class
This card may have started as a distraction, but there’s a very good chance a version of it is making its way into my June classes.
For in-person classes, we’ll likely stamp and die cut the characters instead of cutting directly from the designer series paper so everyone can create their own version during class.
If you’d like to make cards like this with me, keep an eye out for my June class schedule. For info about my upcoming in-person and virtual classes, check out my class descriptions here and my calendar here. I hope to see you at a class sometime soon, but you can always find ideas here on my blog as well as on Facebook and Instagram. Subscribe to my weekly newsletter at the bottom of this page so you don’t miss a thing!
Join Me Live Each Week
I go live every Wednesday at 5 PM Eastern on Facebook and YouTube, where I share cardmaking tutorials, tips, and project ideas using Stampin’ Up products. You can also find all the video replays there as well.
Silly Old Bear Card Measurements:
- Thick Very Vanilla Card Base—5 1/2” x 8 ½”, scored at 4 ¼”
- Very Vanilla – 4” x 1 ½”
- Peaceful Pine – 3” x 4”
- Silly Old Bear 12” x 12” DSP – die cut characters
- Golden Glow – 1” x 2”
- Barely Blush – 1 ½” x 2”
- Crisp Canteloupe – 2” x 2 ¼”
- Hydrangea Hue – 2” x 1 ½”
Silly Old Bear Card Supplies:
![Sweet Old Friends Bundle [ 167620 ]](https://assets1.tamsnetwork.com/images/EC042017NF/167620s.jpg "Sweet Old Friends Bundle [ 167620 ]")
![Sweet Words & Labels Bundle [ 167628 ]](https://assets1.tamsnetwork.com/images/EC042017NF/167628s.jpg "Sweet Words & Labels Bundle [ 167628 ]")
![Silly Old Bear 12" X 12" (30.5 X 30.5 Cm) Designer Series Paper [ 167616 ]](https://assets1.tamsnetwork.com/images/EC042017NF/167616s.jpg "Silly Old Bear 12\" X 12\" (30.5 X 30.5 Cm) Designer Series Paper [ 167616 ]")
![Hundred Acre Woods 3 D Embossing Folder [ 167631 ]](https://assets1.tamsnetwork.com/images/EC042017NF/167631s.jpg "Hundred Acre Woods 3 D Embossing Folder [ 167631 ]")
![Very Vanilla 8-1/2" X 11" Thick Cardstock [ 144237 ]](https://assets1.tamsnetwork.com/images/EC042017NF/144237s.jpg "Very Vanilla 8-1/2\" X 11\" Thick Cardstock [ 144237 ]")
![Very Vanilla 8 1/2" X 11" Cardstock [ 166784 ]](https://assets1.tamsnetwork.com/images/EC042017NF/166784s.jpg "Very Vanilla 8 1/2\" X 11\" Cardstock [ 166784 ]")
![Peaceful Pine 8 1/2" X 11" Cardstock [ 167691 ]](https://assets1.tamsnetwork.com/images/EC042017NF/167691s.jpg "Peaceful Pine 8 1/2\" X 11\" Cardstock [ 167691 ]")
![Golden Glow 12" X 12" (30.5 X 30.5 Cm) Two Tone Cardstock [ 167695 ]](https://assets1.tamsnetwork.com/images/EC042017NF/167695s.jpg "Golden Glow 12\" X 12\" (30.5 X 30.5 Cm) Two Tone Cardstock [ 167695 ]")
![Barely Blush 12" X 12" (30.5 X 30.5 Cm) Two Tone Cardstock [ 167697 ]](https://assets1.tamsnetwork.com/images/EC042017NF/167697s.jpg "Barely Blush 12\" X 12\" (30.5 X 30.5 Cm) Two Tone Cardstock [ 167697 ]")
![Crisp Cantaloupe 12" X 12" (30.5 X 30.5 Cm) Two Tone Cardstock [ 167699 ]](https://assets1.tamsnetwork.com/images/EC042017NF/167699s.jpg "Crisp Cantaloupe 12\" X 12\" (30.5 X 30.5 Cm) Two Tone Cardstock [ 167699 ]")
![Hydrangea Hue 12" X 12" (30.5 X 30.5 Cm) Two Tone Cardstock [ 167696 ]](https://assets1.tamsnetwork.com/images/EC042017NF/167696s.jpg "Hydrangea Hue 12\" X 12\" (30.5 X 30.5 Cm) Two Tone Cardstock [ 167696 ]")
![Early Espresso Classic Stampin' Pad [ 147114 ]](https://assets1.tamsnetwork.com/images/EC042017NF/147114s.jpg "Early Espresso Classic Stampin' Pad [ 147114 ]")
![Stampin' Cut & Emboss Machine [ 149653 ]](https://assets1.tamsnetwork.com/images/EC042017NF/149653s.jpg "Stampin' Cut & Emboss Machine [ 149653 ]")
![Stampin' Seal [ 152813 ]](https://assets1.tamsnetwork.com/images/EC042017NF/152813s.jpg "Stampin' Seal [ 152813 ]")
![Stampin' Dimensionals [ 104430 ]](https://assets1.tamsnetwork.com/images/EC042017NF/104430s.jpg "Stampin' Dimensionals [ 104430 ]")
![Bone Folder [ 102300 ]](https://assets1.tamsnetwork.com/images/EC042017NF/102300s.jpg "Bone Folder [ 102300 ]")
0 Comments