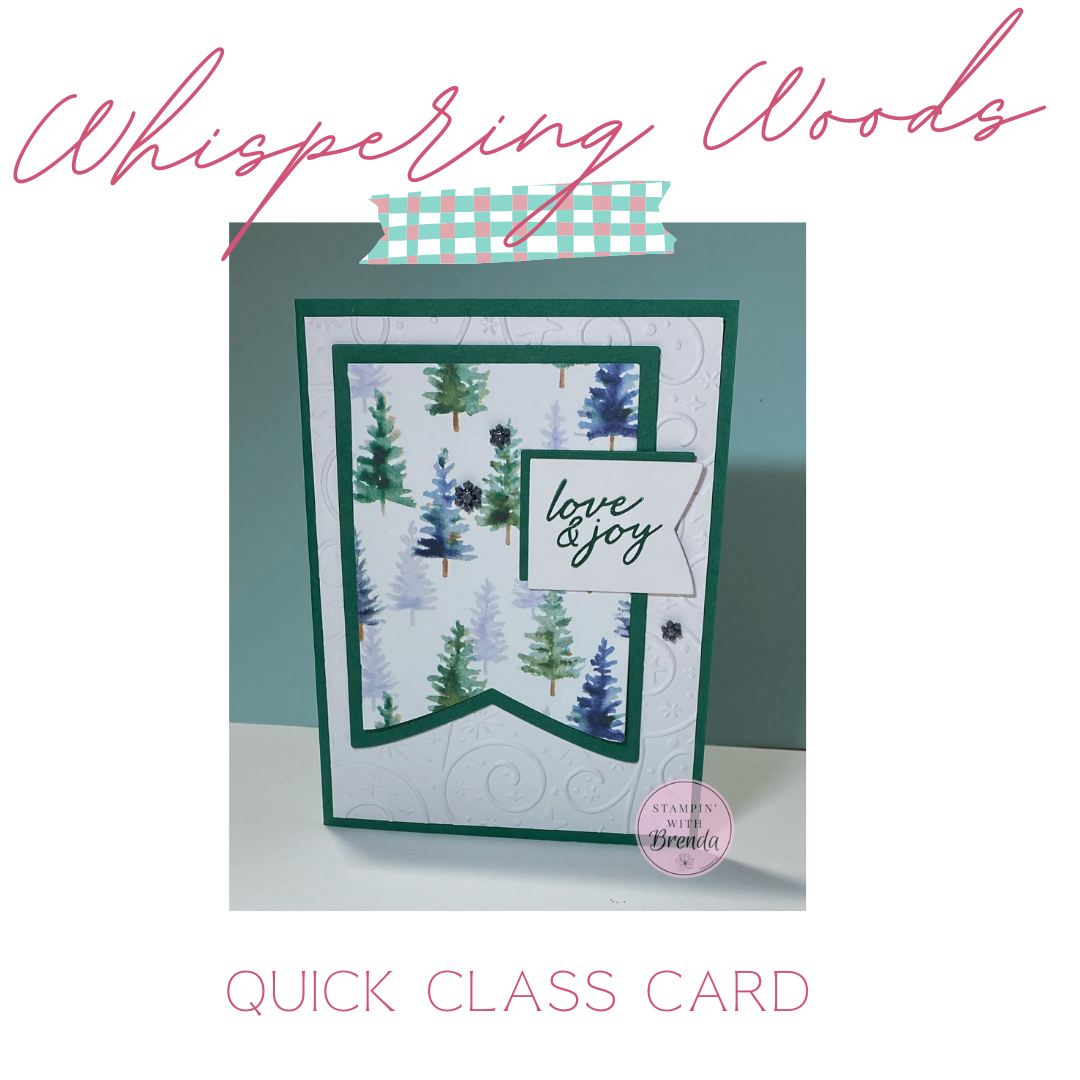
The Whispering Woods Designer Series Paper makes this simple Christmas card feel extra special, and the best part is that the design is incredibly easy to reproduce. During this week’s Quick Class, I took a card layout we had used the night before in my Cards & Company Zoom class and, thanks to a suggestion from Susan in class, gave it a holiday makeover. The result may just be the Christmas card design you’ve been looking for if you need to make a whole stack of cards this year!
Watch the Christmas Card Tutorial
In the replay, I’ll show you how quickly this card comes together, share a simple trick for conserving cardstock, and give you a sneak peek at several new Stampin’ Up! products coming September 1.
Meet the Whispering Woods Designer Series Paper
The star of this Christmas card is the new Whispering Woods Designer Series Paper, available beginning September 1.
This collection is filled with gorgeous blues, greens, trees, and woodland imagery. Some of the reverse patterns are surprisingly versatile, too. They don’t necessarily say “Christmas,” which means you’ll be able to use them throughout the year.
For this card, I chose a beautiful tree pattern that works perfectly with Shaded Spruce cardstock.
There’s another reason this particular paper is special: Stampin’ Up! will make a donation to charities with each package purchased. So I’ll happily be stocking up on this one!
And if you’d like to try Whispering Woods along with all the other new papers without purchasing full packages of each, it’s included in my upcoming September–December Designer Series Paper Share.
Start with a Simple Embossed Background
The card begins with a Shaded Spruce card base and a layer of White Willow cardstock. Because Shaded Spruce is a dark color, I also added White Willow to the inside. That gives you a nice light surface for writing your Christmas message.
For the front, I embossed the White Willow layer using the Swirls of Magic Embossing Folder. This folder was originally introduced with a Halloween theme, but don’t let that limit you! Some of those swirls look like little sparkles or even snowflakes, making it a great choice for Christmas.
It’s another reminder to look beyond the original theme of the products in your craft room. Sometimes the most interesting designs come from using them in an unexpected way.
A Quick Embossing Tip
Whenever I’m adhering an embossed layer, I prefer liquid adhesive.
The surface isn’t completely flat after embossing, so a thin line of liquid glue can get into all those little nooks and crannies and create a stronger bond. You don’t need much. A thin line around the perimeter and through the center is plenty.
Party Banners Make This Card So Easy
The Party Banners Dies are what make this card especially quick to assemble.
The set contains lots of different sizes of nesting banners, and for this design I chose two that fit inside one another.
First, I die cut the larger banner from Shaded Spruce cardstock. Then I cut the smaller banner from the Whispering Woods DSP so that those beautiful trees became the focal point.
Layer the two together and suddenly you have a striking centerpiece without doing any complicated stamping or coloring.
And if you don’t own the Party Banners Dies? You can still recreate the look. Simply cut rectangles from cardstock and Designer Series Paper and use scissors to create the flag-shaped ends.
My Favorite Paper-Saving Trick
Here’s a little trick that’s especially helpful when you’re making multiples.
We need a second, smaller Shaded Spruce banner for the sentiment, but there’s no reason to use another piece of cardstock.
Instead, I cut the small banner right out of the center of the large Shaded Spruce banner.
The DSP is going to cover that area completely, so no one will ever know there’s a piece missing underneath!
When you’re making dozens of Christmas cards, little tricks like this can make a noticeable difference in how much cardstock you use.
Add a Simple “Love and Joy” Greeting
For the sentiment, I shared a sneak peek at a new stamp and die bundle coming September 1.
There are several elements in this new bundle that caught my attention, but for today’s project I needed just one little greeting: Love and Joy
It fits perfectly on the smallest banner from the Party Banners Dies.
Instead of layering the White Willow banner directly on top of the Shaded Spruce banner, I offset the two slightly. That tiny bit of green peeking out helps the greeting stand apart from the tree pattern behind it.
It’s a small detail, but it makes a difference.
Don’t Forget the Sparkle
A Christmas card needs a little sparkle!
I finished the project with another September 1 sneak peek: new Adhesive-Backed Snowflakes.
The package includes Secret Sea snowflakes along with beautiful clear sparkling snowflakes. I chose three for this project and arranged them in a visual triangle around the card.
If you’ve watched me craft before, you probably know that three embellishments is usually my happy place!
They add just enough sparkle to make the card feel festive without making a simple design suddenly feel complicated.
One Card Layout, So Many Possibilities
One of the reasons I like this design so much is its versatility.
The original version we made during Cards & Company used Lovely Blossoms Designer Series Paper. I also used this same layout recently in a class for seniors, substituting different cardstock and retired patterned paper.
The basic construction stayed the same.
That’s what makes a card layout like this so useful. Change the:
- Designer Series Paper
- Cardstock color
- Sentiment
- Embellishments
…and you’ve created an entirely different card.
You could easily use this same layout for birthdays, thank you cards, sympathy cards, weddings, or almost any occasion.
A Christmas Card That’s Perfect for Making Multiples
If you send a lot of handmade Christmas cards, you know that choosing your design is about more than finding something pretty.
It also needs to be realistic to reproduce.
That’s what I especially like about this one. There’s no complicated coloring, intricate assembly, or time-consuming technique. Once your pieces are cut and embossed, you could set up an assembly line and make quite a few cards relatively quickly.
And yet, the embossing, layered banners, beautiful Designer Series Paper, and sparkling snowflakes give the finished card plenty of detail.
In fact, I like this design enough that it is likely to make an appearance in my upcoming Ultimate Christmas Card Class. I’ll be sharing all the details about this year’s class very soon.
Ready to Make Your Christmas Cards?
If you’ve been searching for a handmade Christmas card that’s beautiful and manageable to make in quantity, give this design a try.
Watch the replay above to see exactly how I put it together, including the paper-saving trick and my tips for working with the embossed layer.
Then take a look at the Designer Series Paper you already own. You may discover that you have everything you need to make your own version right now!
For info about my upcoming in-person and virtual classes, check out my class descriptions here and my calendar here. I hope to see you at a class sometime soon, but you can always find ideas here on my blog as well as on Facebook and Instagram. Subscribe to my weekly newsletter at the bottom of this page so you don’t miss a thing!
Happy crafting!
Whispering Woods Card Measurements:
- Shaded Spruce Card Base—5 1/2” x 8 1/2”, scored at 4 1/4”
- White Willow—4” x 5 1/4” (2), 1 1/2” x 2”
- Shaded Spruce Two-Toned —3” x 4 1/2”
- Whispering Woods DSP—3” x 4”
Whispering Woods Supplies:
![Party Banners Dies [ 165264 ]](https://assets1.tamsnetwork.com/images/EC042017NF/165264s.jpg "Party Banners Dies [ 165264 ]")
![Swirls Of Magic Embossing Folder [ 168179 ]](https://assets1.tamsnetwork.com/images/EC042017NF/168179s.jpg "Swirls Of Magic Embossing Folder [ 168179 ]")
![Shaded Spruce 8-1/2" X 11" Cardstock [ 146981 ]](https://assets1.tamsnetwork.com/images/EC042017NF/146981s.jpg "Shaded Spruce 8-1/2\" X 11\" Cardstock [ 146981 ]")
![Shaded Spruce 12" X 12" (30.5 X 30.5 Cm) Two Tone Cardstock [ 166697 ]](https://assets1.tamsnetwork.com/images/EC042017NF/166697s.jpg "Shaded Spruce 12\" X 12\" (30.5 X 30.5 Cm) Two Tone Cardstock [ 166697 ]")
![White Willow 12" X 12" (30.5 X 30.5 Cm) Cardstock [ 166703 ]](https://assets1.tamsnetwork.com/images/EC042017NF/166703s.jpg "White Willow 12\" X 12\" (30.5 X 30.5 Cm) Cardstock [ 166703 ]")
![Shaded Spruce Classic Stampin' Pad [ 147088 ]](https://assets1.tamsnetwork.com/images/EC042017NF/147088s.jpg "Shaded Spruce Classic Stampin' Pad [ 147088 ]")
![Stampin' Cut & Emboss Machine [ 149653 ]](https://assets1.tamsnetwork.com/images/EC042017NF/149653s.jpg "Stampin' Cut & Emboss Machine [ 149653 ]")
![Bone Folder [ 102300 ]](https://assets1.tamsnetwork.com/images/EC042017NF/102300s.jpg "Bone Folder [ 102300 ]")
![Stampin' Seal [ 152813 ]](https://assets1.tamsnetwork.com/images/EC042017NF/152813s.jpg "Stampin' Seal [ 152813 ]")
![Take Your Pick [ 144107 ]](https://assets1.tamsnetwork.com/images/EC042017NF/144107s.jpg "Take Your Pick [ 144107 ]")
![Multipurpose Liquid Glue [ 110755 ]](https://assets1.tamsnetwork.com/images/EC042017NF/110755s.jpg "Multipurpose Liquid Glue [ 110755 ]")
0 Comments